
Sunday, December 31, 2006
Sunday, December 24, 2006
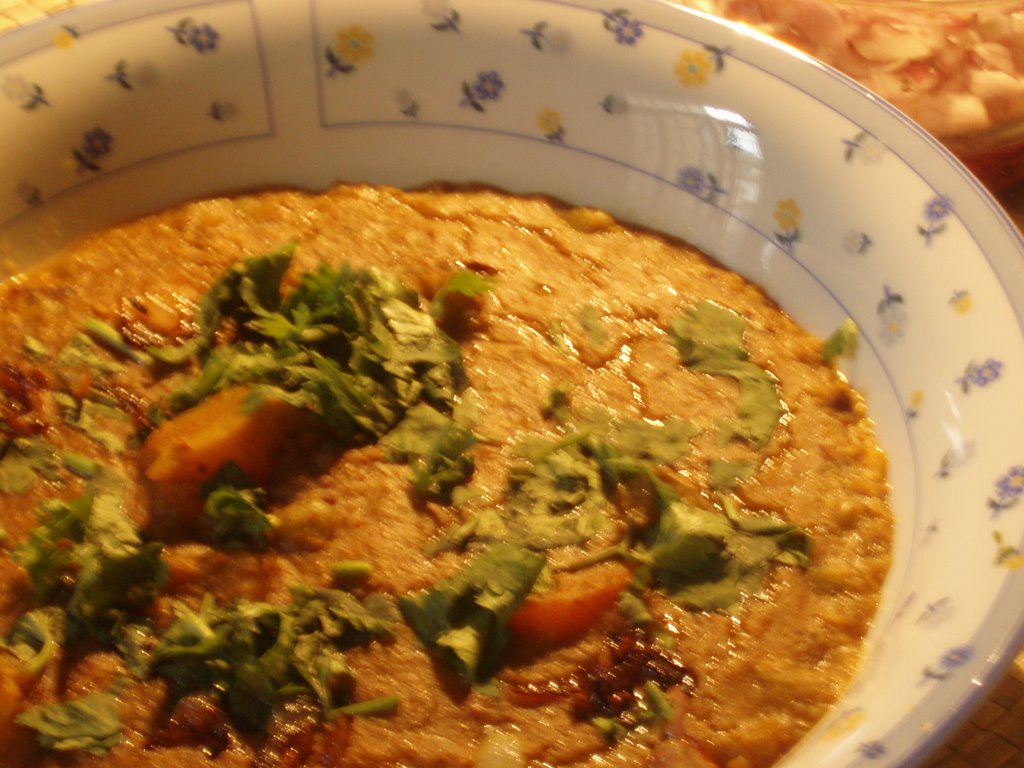
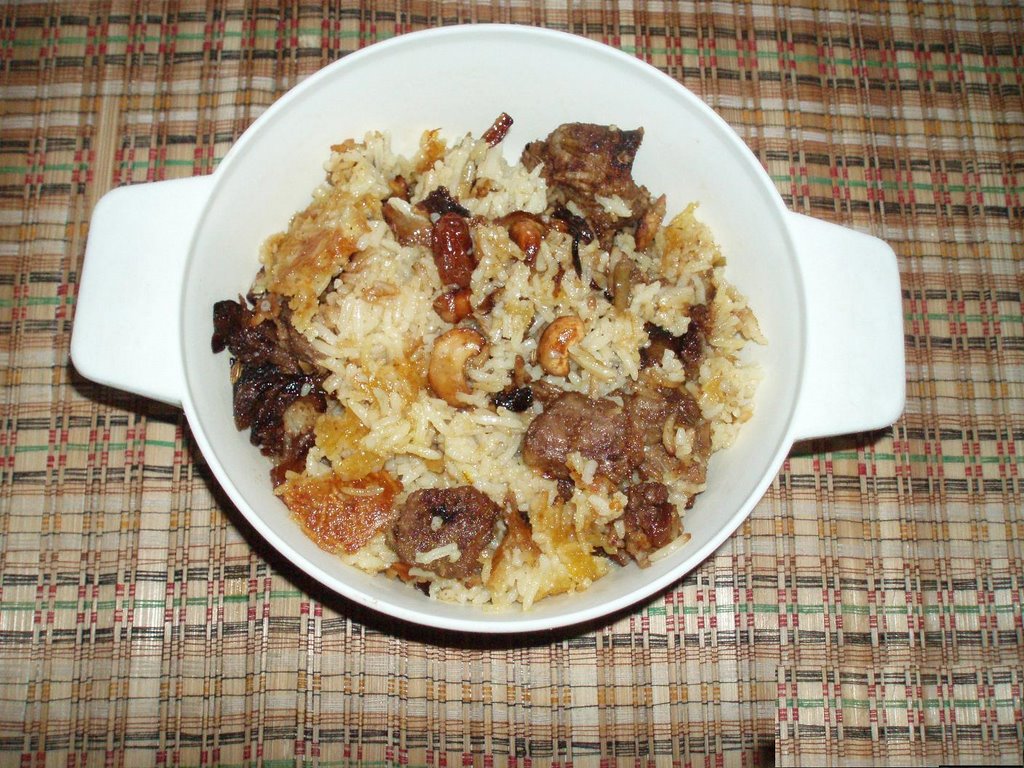
For the Festivities - Dum ke Laoz
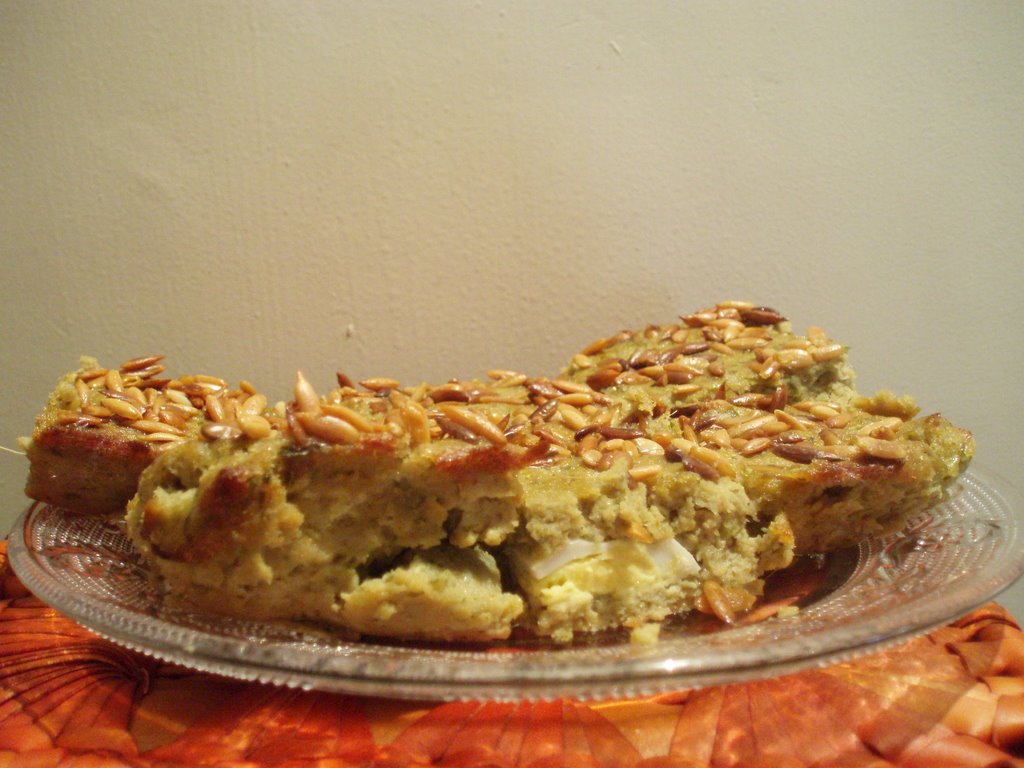
This is a dressy dish that I’ve always dreamt of making but couldn’t because I would always fail to memorize the recipe – in the last few years since it’s been published, I almost always paid for this book but put it back regretfully as I felt it was too much of an indulgence.
A paperback never materialized but it so happened, though, that I had accumulated enough points on my loyalty card to be able to afford it without much guilt, so here it comes! The book is ‘A Princely Legacy – Hyderabadi Cuisine’ written by Pratibha Karan and published by Harper Collins Publishers India.
This is a really simple dish and there’s a terrific picture in the book, not a close-up, though. And the picture in the book looked typically golden brown, while my finished product is more green. But the proportions were haphazardly followed and I probably put in more coriander than necessary, giving it that green cast, but I liked it.
Today’s guinea pigs said it looked like a pastry/cake, which was good, because the book explains that’s how it gets its name - Laoz also means a sweet dish. In Hyderabad, it’s also called kheeme ki barfi, lagan ke kabab and Kashmiri laoz.
Most of the method is from the book (your forgetful cook did something wrong, as usual) but the measures are mostly mine:
500 gm minced meat (the book said 750 gm)
1-inch piece ginger, chopped
8 cloves garlic, chopped
A pinch of turmeric
A tsp of chilli powder
½ cup yoghurt/curds
1 egg, beaten
2 hard-boiled eggs, sliced
3 small onions, minced
½ cup coriander leaves, chopped
2-3 green chillies, chopped
A handful of cucumber seeds/skinned & flaked almonds (you can also use watermelon or muskmelon seeds or a combination of all these)
1 tbsp oil, if you like, to toast the seeds
A little more oil, to grease the baking dish and coat the kheema mix before it goes into the oven
Salt to taste
Boil the minced meat with ginger, garlic, turmeric, chilli powder, yoghurt, and salt, till tender. Grind into a fine paste (said the book, but I ground it into a fine paste with the beaten egg, onion, coriander and green chillies, which had to be mixed in after the cooked mince was ground.) Divide into two portions.
Fry the seeds, set aside.
In a greased baking dish, spread one portion evenly. Put the egg slices on it and cover with the remaining mince. Brush this layer liberally with oil – I used about two spoons. Sprinkle the fried seeds or nuts on top. Bake till golden. It takes about 30 minutes.
My experiment resulted in a spicy, moist mince cake which was a hit with most of the guinea pigs. Bon appetit!
WISH YOU ALL A MERRY CHRISTMAS!
Tags: Kheema Minced Meat Kabab Baked dish
Friday, December 22, 2006
Pandan-Coconut Milk Jelly

DO CLICK ON THE PICTURE, IT'S BETTER VIEWED LARGE!
For someone who doesn’t use any form of coconut even once a month, Jihva seems to have put me in overdrive. I never thought I’d submit even one dish for Jihva for Coconut, leave alone two. But my thriving pandan shrub and unused packs of coconut milk and sugar are making for some very uncharacteristic behaviour, and so here it is!
This is a Thai/Malay recipe that I arrived at after reading various versions in books as well as on the Net. You can use agar agar for a more authentic and as a vegetarian option in place of the gelatin but I’m not sure of the proportions. The pandan didn’t lend its usual fragrance to this dish but just smelt like sap, even after I put in some vanilla essence. But I guess this is a dish high on texture and looks (though my photo may not do justice to it); it has a strong smell but a delicate flavour – what attracted me was the double-layered looks of the jelly.

For the pandan layer:
Gelatin (unflavoured): 1 tbsp
Water: 1½ cups
Sugar: ½ cup
Pandan leaves: 8-10, cut into strips
For the coconut milk topping:
Coconut Milk: 1½ cups
Gelatin (unflavoured): 1 tbsp
Sugar: ¼ cup
Preparation: Bruise the pandan leaves – you can pound them in a mortar and pestle, or whiz them once in the grinder. Boil them in a cup of water and strain the liquid.
Reserve one tbsp of the pandan water.
Dissolve gelatin in the hot pandan water. Stir well over low heat. Add the sugar, let it come to a boil and allow to simmer for a couple of minutes.
Put the reserved pandan water into this and let it come to a boil again. Pour it into a small-ish container/mould and put it in the refrigerator.
For the topping, dissolve gelatin in coconut milk on low heat, add sugar and stir well. Let it come to a boil.
When it’s still hot, pour the topping over the pandan jelly.
Before serving, cut the jelly into small pieces/shapes.
Tags: Pandan Coconut Milk Jelly Pudding
Wednesday, December 20, 2006
Jihva for Coconut - Fish Curry

This is one vegetable technology hasn’t improved. I’ve seen vacuum, hand-held, electric – but nothing as effective nor easy to use as the coconut graters of our childhood.
Sit on the floor, rest your knee against the wooden base the lever and grater are affixed to — turn the lever on the right and the rotary grater on the left scoops out the fleshy part of the coconut held over it into zillions of soft, white snowflakes. Even the kattipeeta (the traditional implement used to cut/slice vegetables – usually a curved blade attached to a piece of wood), which ends in a sharp, serrated disc of steel meant for the coconut is not as effective.
That being said, I must say that when Ashwini announced Jihva for Coconut, I had to rack my brains long and hard to come up with an entry. For me, my fascination with coconut lay, and still lies, in the grater I described, the spray of fresh white against newsprint – but apart from the coconut-red chilli-tamarind chutney and kobbari louzu (coconut-jaggery balls) that used to be made at home, I don’t remember other ways we used it, perhaps to thicken a meat gravy? I’m not sure.
When I grew up and got interested in cooking, cookbooks made using coconut an often tiresome and doubt-ridden process. When it had to thicken a curry, the grinder never seemed to do its job properly, at whatever speed, pulse, frappe, whip, beat – the ‘paste’ would end up a loose mix of water, bits of chilli, coconut that refused to grind — and imparted an overwhelmingly coconutty taste to everything it was used in. I don’t think we used coconut milk at home, ever, so which cookbook was right? Squeeze the grated coconut with bare hands, put it in hot water and whiz it in the mixer, thin milk, thick milk, second extract, first extract? So out the coconut went, out of my kitchen and now and then makes an appearance in milk carton form, whence this recipe originates.
Fish curry
Seer fish: ½ a kilo - skinned, boned and cubed
Onions: 3 small, chopped
Thick coconut milk: 1½ cups
Dry red chilli, ground: 6
Pandan leaf: 2
Basil: A little
Cinnamon: 2-inch piece
Curry leaves: A few
Turmeric: A pinch
Fenugreek: ¼ tsp
Ginger-garlic paste: 1 tsp
Limes: 1-2, juiced
Salt: To taste
Put in everything but the limes into a pan and cook till the fish is done. Once it cools, add the lime juice. That’s it, you’re done!
Sunday, December 17, 2006
A Meme About Them
I was inspired to start this meme when I visited Jayashree’s site My Experiments with Food. She wondered whether we gave other bloggers a face and I joked that we should start a meme on ‘how do I think they look.’ When I visited her site a few days later, Maheswari of Beyond the Usual had seconded my suggestion, and so here it is!
I’m not sure how to take this forward except to tag a few people and request them to link me (http://whenmysoupcamealive.blogspot.com) in their responses and in turn mention my request to the people they tag – this is the first time I’m doing something like this and I’d like to see the course it takes.
So, I’m tagging Maheswari, Jayashree and Sandeepa of Bong Mom's Cookbook – all you have to do is tell us what you imagine your blogger friends look like, and maybe why you think they look so. I’m not sure if I can give my own opinions without being tagged so I’m not volunteering any :) And naturally, you'll do it only if you want to.
Tuesday, December 12, 2006
Prawn Pickle


Growing up, pickles with any sort of meat were never something I had heard about, so it was a revelation tasting meat pickle brought back by friends from Kerala in our hostel.
It turned out later that that meat was beef so that effectively ended my gustatory experiments with meat and pickle but slowly, over the years, I began hearing of how so-and-so back at home had heard of somebody who made ‘chicken pachchadi’ and ‘mutton pachchadi.’ These reports would always be accompanied by an expression that said “What’s the world coming to? What will people pickle next?” I hadn’t heard of fish and prawn pickle even then, not from any part of the country, but came to discover them only much later.
The prawn pickle that I’ve tasted a few times over the last few years is made with lemon juice, garlic, fenugreek and mustard, much like the time-honoured recipes of many other pickles Andhra homes are famous for. I’ve even tasted one with the bite of cloves, which I found excellent.
These days, of course, due to the home-style stores in Andhra that specialize in making and vending traditional snacks and sweets once not usually found in sweet shops, non-vegetarian pickles seem to have become more popular and less ugh! The morsels found in them are an apology for meat and the masala is black, fried to death, probably due to the huge quantities they undertake to make.
At a book exhibition recently, I found a book that had recipes for two kinds of prawn pickle – one with tamarind and the other with lemon juice. I tried the lemon juice version today, and while I misread the instructions and messed up things midway, the end product didn’t turn out too bad.
Of course, it’s still just a couple of hours since I made it – after wrestling with the photos, I immediately stuck it in the fungus-proof interiors of my wonderful fridge, so I’m not sure how good it inherently is.
Here’s the recipe then, as it’s found in the book. I do hate it, though, when these books don’t specify the kind of salt or the measure but blandly say “Salt - to taste.” Maybe the book expects its readers to be experienced, all-knowing cooks, I don’t know. Funnily enough, the list of ingredients in this recipe totally missed mentioning the salt but all the other pickle recipes said that. It’s not as if it’s a dish you can easily adjust the salt in – pickle-making is a delicate and difficult enterprise, all the more so when it’s your first time, why don’t authors think of that? I asked around and crushed two small fistfuls of rock salt and added it to the pickle – that’s another of its inherent uncertainties!
Prawns: 1 kilo (2.2 lb) (I used only half the quantity and frozen, thawed ones as I don’t know how to handle fresh ones)
Garlic: 4 cloves (you can increase the amount)
Turmeric: 1 tbsp (increase it, it might give the pickle more staying power)
Chilli powder: 100 gm
Salt: I used two small fistfuls of crushed/ground rock salt
Mustard powder: 50 gm
Fenugreek powder: 50 gm
Lime juice: 1 cup (I ultimately had to use 2 cups for it to retain some moisture)
Oil: ½ a kilo (I forgot to measure the volume, sorry, but it’s not impossible to weigh)
 Shell the prawns, wash well, drain and place them in a bowl. In a frying pan, heat half the oil to smoking point and fry till “red.” Cool.
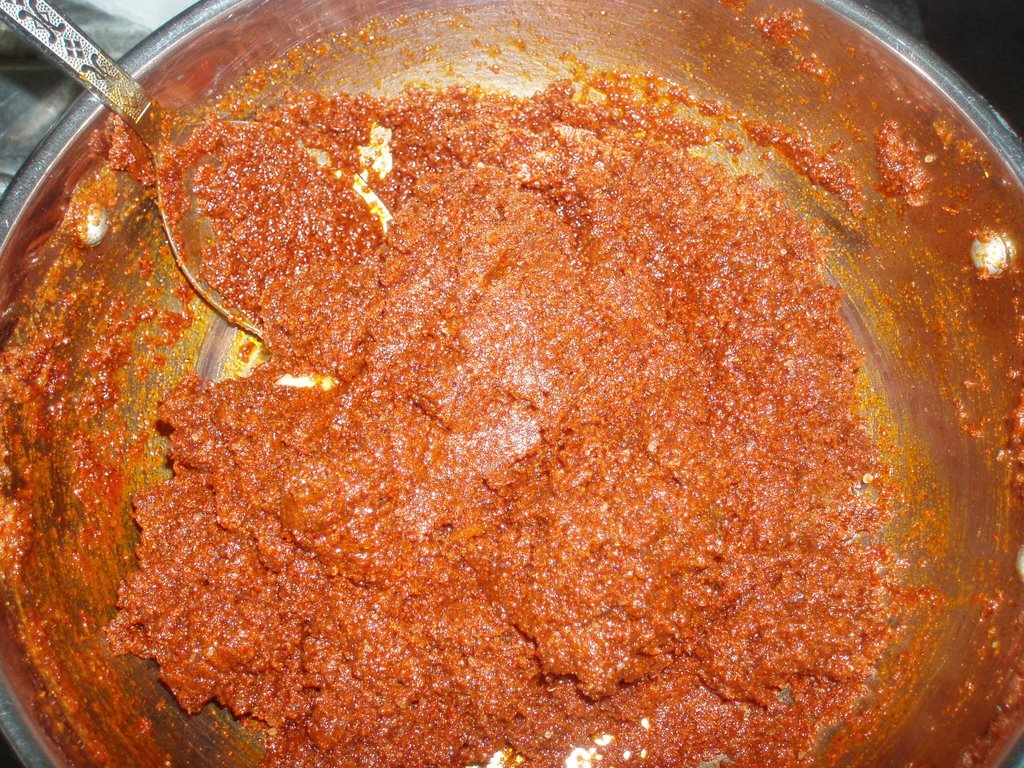
In the same frying pan, put in the rest of the ingredients, mix with the rest of the oil, then mix with the prawns and bottle in sterilized jars. Leave it to steep for a day and check for seasoning the next. Meant to be eaten with hot, soft rice. I would recommend putting it in the fridge.
Tags: Prawn Pickle Non-vegetarian pickle
Friday, December 08, 2006
Bounty from the East

I knew it would arrive this way, not giving me time to savour receiving it and opening it immediately – smack bang in the middle of work, when I’m juggling two telephone calls and can’t open the door immediately when the bell rings. But thankfully, the postman didn’t have to ring twice; I got to the door in good time to be faced by a pleasant postman who said, “Foreign parcel, it was too big to leave in your letter box and the watchman said I should hand it over to you personally.” I thanked him at least thrice, closed the door and made a beeline for the camera, all the while looking nervously at my phones, willing them not to ring.
There, then, was my Blogging By Mail package from Kai Rui of Singapore, with many unusual ethnic foods – the most unusual had to be the chilli-tapioca-ikan bilis (a kind of fish) – I’ve never seen anything like that, neither the combination nor the brilliant red of the snack, made all the more bright by the orange of the packaging. Then there was a big packet of sultana biscuits, Kai’s childhood favourite, as she explains in a nice, neatly-written letter (how nice to receive letters on paper, such a rarity these days). There is also a pack of Singapore Hainanese Chicken Rice spice mix – Kai explains that it actually doesn’t originate from the Hainan island in China but is unique to Singapore, where it has a fervent following. In her favourite stall in Maxwell Road Market, she says, you have to wait for more than an hour to get that “plate of heavenly goodness.”
The Mee Siam is another national dish, of Malay origin. Kai describes it as having a “complex and intriguing” taste as it’s sweet and tangy at the same time. I can identify with that, Kai – we make vegetable stews with tamarind and jaggery, and they too are sweet and sour.
And I dread the sugared peanuts – if I begin eating them, I won’t be able to stop, I’m afraid. The ikan bilis and sugared peanuts are common snack foods served to guests when they visit during the Chinese New Year, Kai explains.
I’ve not opened any of these packets yet – the ikan bilis looks too beautiful to cut through! They came this morning, and I will update you when I use them. Thank you, Kai, for the gorgeous food, and thank you, Stephanie, for the pairing up and the organizing. Both of you have certainly dispensed happiness!
Tags: Blogging By Mail
Wednesday, December 06, 2006
Jihva and Just Deserts
The life of a food blogger is a hard one. Especially when events come around, and the pressure on oneself is to innovate/exhibit rather than humbly participate.
When Kay of Towards a Better Tomorrow announced Jihva for Jaggery and requested us to send in unusual recipes, yours truly immediately lined up two ambitious ventures, only to end up with thumping failures.
The lessons (oh yes, there always have to be lessons from failures): Trying to create a dish merely on the strength of having gorged on it throughout your life does not magically bestow on the eater the recipe; and payasam can curdle at any stage!
A friend recently said she didn’t believe in second attempts with recipes. She never, ever wanted to relive the failure, she said - the dish had turned an enemy, a friend who had failed her. Thanks to Jihva, I did make a second attempt, which is now making the rounds at work because I cannot bear to have a constant reminder at home of the consequence of my hubris.
Yes folks, in the first episode, I set out to make this:
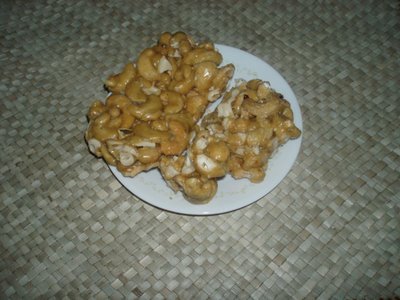
And ended up with this:

Both versions are called Jeedipappu Paakam, and in the parts I come from, the first is celebrated for its addictive, ghee-laden, cardamom-flavoured, expensive existence. The texture of the jaggery against the cashew nuts it envelops is something I can only describe as similar to icing. It comes in great big slabs, or rocks, and sometimes even a pair of brawny hands find the going tough when they have to break off smaller pieces – a firm tap with a hammer, or a sturdy knife driven into it, like the blade of an axe, and then borne down upon with all the might of your shoulders, does the trick.
But this is not to say it’s difficult to eat. On the contrary, it’s easy to get carried away. A friend in hostel used to overdose on this every time I took it back with me after vacation, and even the very real risk of a troubled stomach made only more sickening by the water scarcity in the loos couldn’t deter her from chomping on it all the time.
Well, I couldn’t find a recipe for it but it had to be simple, I thought: Just melt a cupful of jaggery in a little water to a stage where the syrup holds its shape in a bowl of water when tested, pour in a cup of cashews, a few spoons of ghee and a pinch of powdered, roasted cardamom seeds, whisk it off the fire and spread it in a plate greased with ghee, and your paakam is ready. (The rocks and slabs were, I thought, a function of volume – I was no accomplished mithaiwali after all, just a zealous, new food blogger trying to wow the world.) Alas! It was not to be - I ended up with my first chikki.
Not deterred, I stopped off at the store on my way back from work, bought a cannonball of light yellow jaggery, some more cashew and spent a good part of the night powdering the former, all the while dreaming of perfection from the second attempt, and the other dish I planned to display, a traditional, festive one that too!
My second attempt was just as bad, or as good as my first – and while my guinea pigs ate it without question and even the odd compliment, the ignominy of it all rankled – and instead of leaving well alone, I launched into my second sweet soon after I got back from work.
{Drumroll} Paalataalikalu!
My recipe for this sago-and-rice flour noodles payasam came off the Net. The sago was processed as per one of my fail-proof home cooking books, and everything was going along swimmingly fine. Even the rice flour, with which I was working for the very first time in my life, was cooperating. And what did I do? I raised the heat to boil the rice flour noodles, and met my comeuppance in the form of a heaving, creamy-brown ocean of curdle that I couldn’t salvage. I, friends, had got my just deserts!
{Curtain call, bow}
Tags: cashew chikki jaggery dessert
When Kay of Towards a Better Tomorrow announced Jihva for Jaggery and requested us to send in unusual recipes, yours truly immediately lined up two ambitious ventures, only to end up with thumping failures.
The lessons (oh yes, there always have to be lessons from failures): Trying to create a dish merely on the strength of having gorged on it throughout your life does not magically bestow on the eater the recipe; and payasam can curdle at any stage!
A friend recently said she didn’t believe in second attempts with recipes. She never, ever wanted to relive the failure, she said - the dish had turned an enemy, a friend who had failed her. Thanks to Jihva, I did make a second attempt, which is now making the rounds at work because I cannot bear to have a constant reminder at home of the consequence of my hubris.
Yes folks, in the first episode, I set out to make this:

And ended up with this:
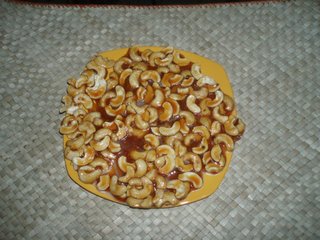
Both versions are called Jeedipappu Paakam, and in the parts I come from, the first is celebrated for its addictive, ghee-laden, cardamom-flavoured, expensive existence. The texture of the jaggery against the cashew nuts it envelops is something I can only describe as similar to icing. It comes in great big slabs, or rocks, and sometimes even a pair of brawny hands find the going tough when they have to break off smaller pieces – a firm tap with a hammer, or a sturdy knife driven into it, like the blade of an axe, and then borne down upon with all the might of your shoulders, does the trick.
But this is not to say it’s difficult to eat. On the contrary, it’s easy to get carried away. A friend in hostel used to overdose on this every time I took it back with me after vacation, and even the very real risk of a troubled stomach made only more sickening by the water scarcity in the loos couldn’t deter her from chomping on it all the time.
Well, I couldn’t find a recipe for it but it had to be simple, I thought: Just melt a cupful of jaggery in a little water to a stage where the syrup holds its shape in a bowl of water when tested, pour in a cup of cashews, a few spoons of ghee and a pinch of powdered, roasted cardamom seeds, whisk it off the fire and spread it in a plate greased with ghee, and your paakam is ready. (The rocks and slabs were, I thought, a function of volume – I was no accomplished mithaiwali after all, just a zealous, new food blogger trying to wow the world.) Alas! It was not to be - I ended up with my first chikki.
Not deterred, I stopped off at the store on my way back from work, bought a cannonball of light yellow jaggery, some more cashew and spent a good part of the night powdering the former, all the while dreaming of perfection from the second attempt, and the other dish I planned to display, a traditional, festive one that too!
My second attempt was just as bad, or as good as my first – and while my guinea pigs ate it without question and even the odd compliment, the ignominy of it all rankled – and instead of leaving well alone, I launched into my second sweet soon after I got back from work.
{Drumroll} Paalataalikalu!
My recipe for this sago-and-rice flour noodles payasam came off the Net. The sago was processed as per one of my fail-proof home cooking books, and everything was going along swimmingly fine. Even the rice flour, with which I was working for the very first time in my life, was cooperating. And what did I do? I raised the heat to boil the rice flour noodles, and met my comeuppance in the form of a heaving, creamy-brown ocean of curdle that I couldn’t salvage. I, friends, had got my just deserts!
{Curtain call, bow}
Tags: cashew chikki jaggery dessert
Sunday, December 03, 2006
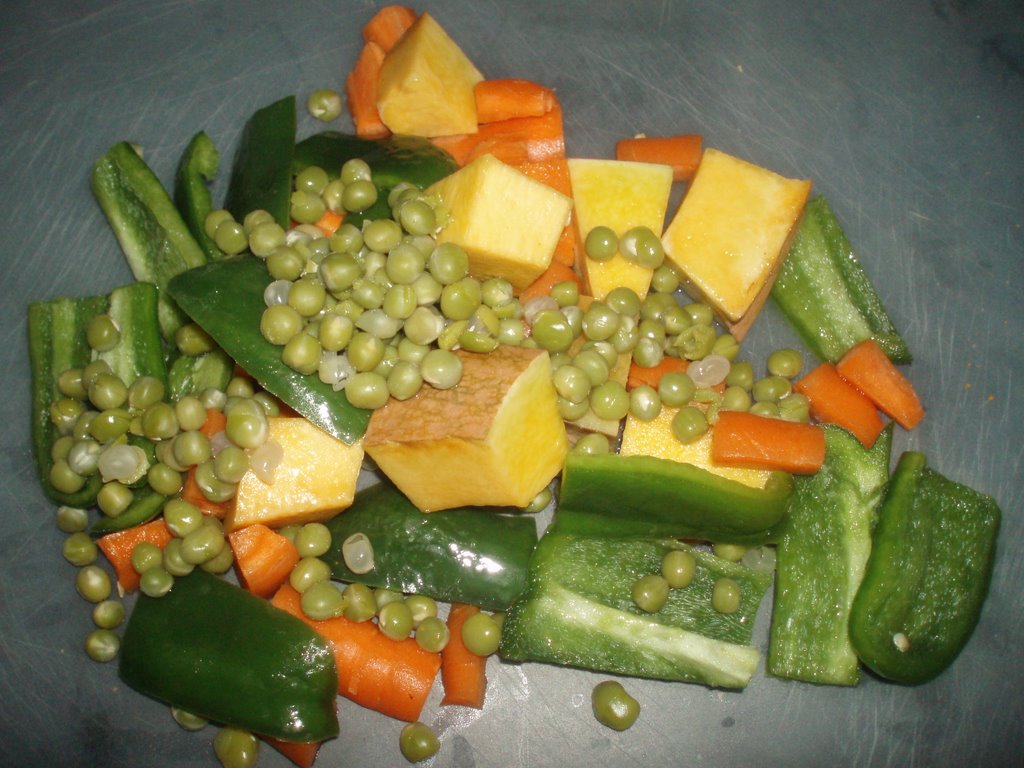
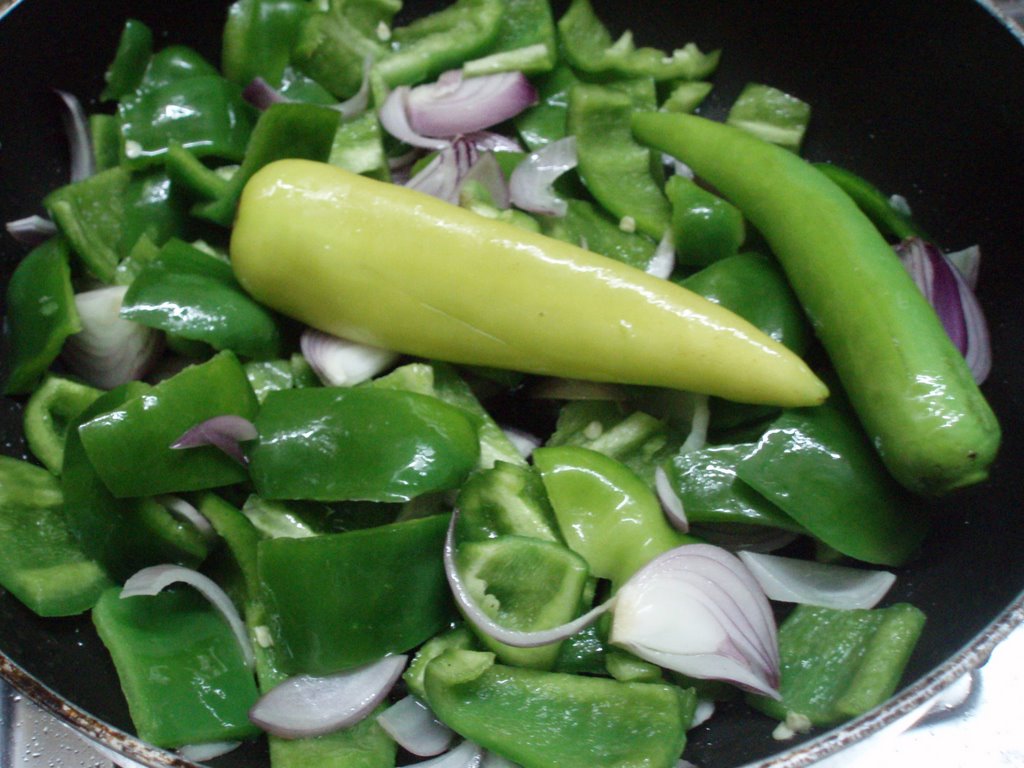
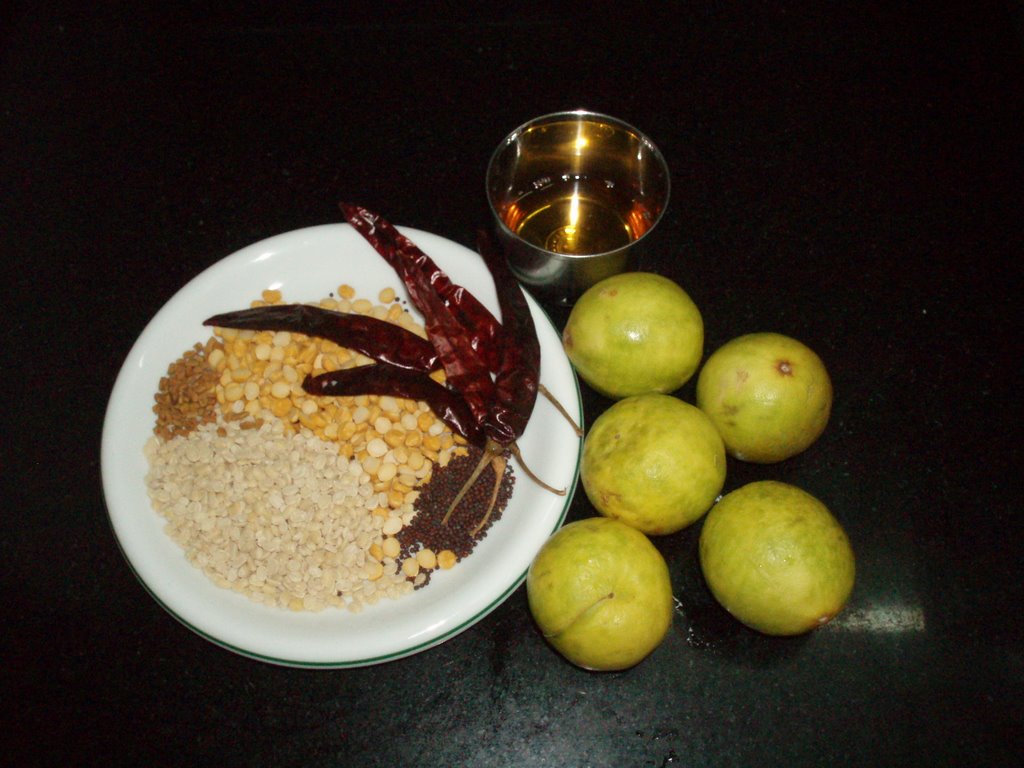
A Party Piece - Haleem Goes Vegetarian
This is a party piece even when it’s non-vegetarian. Come Ramzan, and visitors to Hyderabad would be whisked off to the Old City to try the Haleem and other dishes that would make an appearance only that month, apart from the kababs and khubani ka meetha (stewed apricots with custard) that the city is so famous for.
Now Haleem seems to be available everywhere in the city – I visited last year during Ramzan and every restaurant big and small worth its name had banners advertising its availability. I even remember Hareesh (a dish, not a guy), but am not too sure what it was or even whether I tasted it.
However, in the after-life (life after Hyderabad, that is, this is no ghost writing this piece), most of my friends are vegetarian, and pulaos, fried rice and “variety rice” (that favourite Madrasi term for various flavoured rice dishes) soon pall as they are commonly found. I had just begun collecting cookbooks then, and was thrilled to find this dish which proved to be the delight of every get-together we had since. Sadly, though, work and different schedules ensured we couldn’t meet often, but as a ‘welcome back’ dish for someone who loved it but told me not to bother with it, it’s just right.
The basic recipe is from Rotis & Naans of India by Purobi Babbar (Vakils, Feffer and Simons, 1990) but I made a few changes based on what I found in my fridge. On to the recipe, then!
1 ½ cups broken wheat (I used coarse wheat rava)
4 tbsp red gram/toor daal/kandi pappu
2 tbsp green gram/moong dal/pesara pappu (the book suggested masoor daal)
2 tbsp split Bengal gram/channa daal/senaga pappu
100 gm altogether – peas, yellow pumpkin, and carrots, cut into pieces (the book suggested peas, cauliflower and brinjals)
2 capsicum/green bell pepper, cut
3 medium onions, sliced
8 cloves garlic and 2 tbsp grated ginger, ground to a paste
1 tsp turmeric powder
1 tsp chilli powder
1 tbsp curry powder/garam masala
1 tbsp coriander/dhania powder (the book suggested 1 tbsp each of coriander and cumin seeds ground to a fine paste)
2 level tsp salt
6 cups of water
8 tbsps of ghee or oil (I used my flavoured ghee)
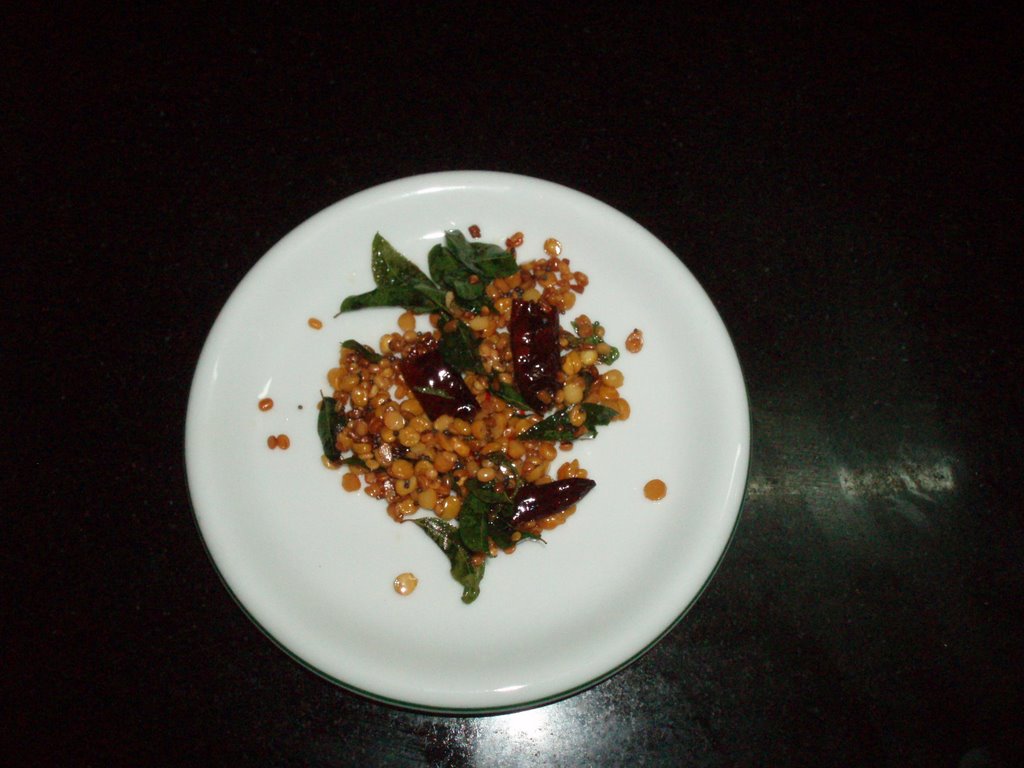
For garnish:
1 onion, sliced and fried crisp
Coriander leaves/hara dhania/kothimeera, chopped
Soak wheat and dals separately overnight. Wash well. Drain and keep aside for 20 minutes.
Heat half the melted ghee or oil. Fry onions until brown. Stir in garlic, ginger paste, fry for a few minutes. Add coriander powder, turmeric, chilli, salt and add wheat and dal mixture. Stir well.
Pour in the water. Cover and cook slowly over low heat for one hour till the wheat is soft and pulpy and the daals are tender. Add vegetables. Stir well. When ready, add curry powder and the remaining ghee or oil.
Keep stirring often. Despite all my heroic, conscientious efforts, it did keep sticking to the bottom of the pan between the stirs. Cook over low heat even now, but without the lid until the ghee floats to the top and the colour turns golden.
Once you’ve transferred it into a serving bowl, sprinkle the fried onions and coriander on top. Serve hot with lemon slices, mint leaves and a simple salad of cucumber, onion and tomato.
Warning: This takes at least two hours to make and a tremendous amount of patience. You also need to be alert. This stew can splutter and burn your arms and fingers. The end result is worth it, but then, make sure you serve it in limited doses to those who shouldn’t be eating all that ghee or oil!
As I was finishing it off and reached for something in my shelf, I noticed my bottle of olive oil looking down at me. Given that most of the ingredients are also used in Mediterranean cuisine, this dish would have probably tasted as good but lighter with olive oil, if any of you try, don’t forget to drop me a line.
And to borrow what many of my vegetarian friends unfamiliar with paneer/mushroom/tofu would say: “I believe it tastes just like non-veg.” It does.
Tags: haleem vegetarian
Sunday, November 26, 2006
A Random Chicken and ... Ohmigourd!
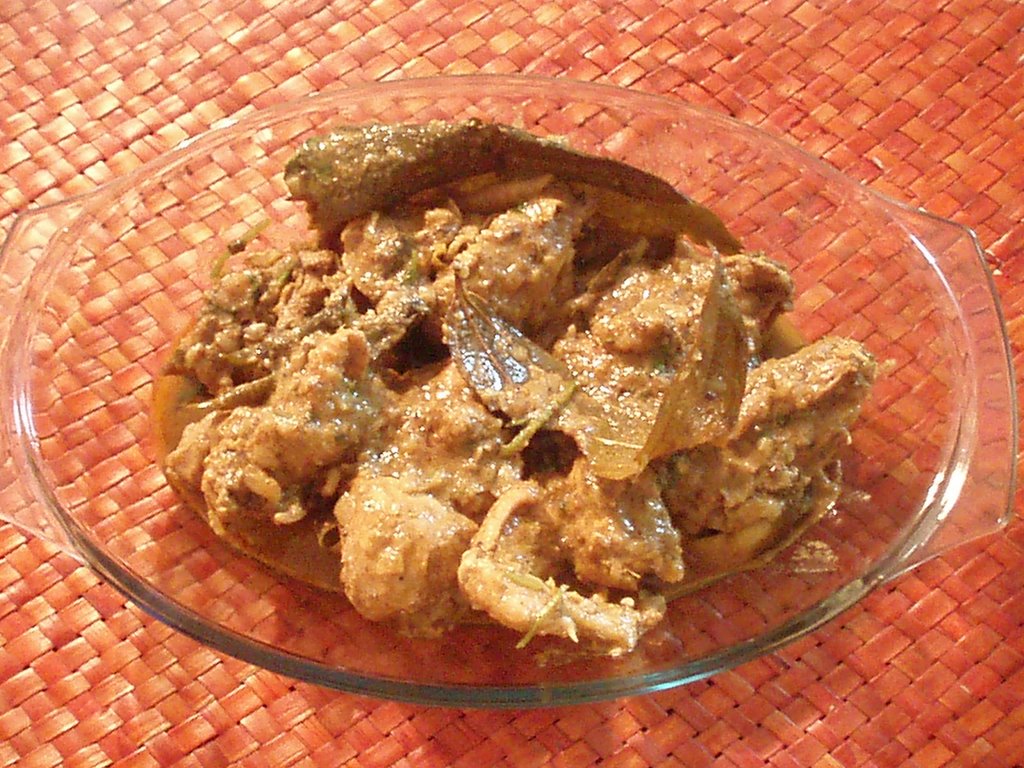
This chicken was an afterthought. It’s been ages since we summoned up the energy to buy and cook any meat at home — it involves a long, smelly, unhygienic and fly-ridden wait at the butcher’s, and the only time we have is Sunday mornings. Go a little late and you have to come back empty-handed. However, having found it in our weekly shopping expedition all nice and wrapped up sans the usual puddles and sticky splotches of bloody ooze on the shelves of the chiller (another big put-off), we bought it and turned it into one of the tastiest chicken curries we’ve ever made. Now I know how to make a South Indian ‘military’ hotel-type chicken curry – it may not be the exact recipe, I may not ever make it again, but it smelt just like it and I know how to do it, isn’t it thrilling? All those days of wondering why we never ever get that rich brown colour, that thick gravy, that flavour – well, all will be revealed soon!
(For those who don’t know what a military hotel is, it’s the term used in South India (in North too?) by a non-vegetarian hotel to distinguish itself from a meatless one – probably because of the belief that soldiers in the army eat a lot of meat everyday to gain and keep up their strength. It also serves very well to keep vegetarians from straying into its precincts!)
I’ve called it Random because I just threw in whatever I had by way of marinade, there was no recipe and the measures were slapdash:
Two ladles of fresh curds
Two fat pinches of turmeric
A tablespoon of ginger-garlic paste
Some Sambaar kaaram (a chilli powder mix with garlic, salt and coriander, NOT to be mistaken for saambaar podi/powder)
A really hefty pinch of curry powder/garam masala
Some more salt and coriander powder
I mixed in the marinade really well and sat the whole thing in the refrigerator for about three hours.
Siesta over, here’s what you need to do:
Chop two onions
Slit three green chillies (one of mine had turned a ripe red)
Fry them in three tbsps of oil
Throw in some leftover mint leaves (mine were 10 days old) and a few coriander leaves/cilantro
Add a couple of bay leaves
Fry this till all of it wilts
Then put in the chicken with the marinade, pour a little more water and cook covered on medium fire. Throw in a fistful of curry leaves, stir. (Voila, this is what gives it that military hotel taste!) Keep turning every five or seven minutes. Check the chicken for ‘doneness’, seasoning and add some more curry powder at the end. Simmer longer if you want a thicker gravy. Sprinkle with chopped coriander leaves. Soft, hot rice is a good accompaniment. Truly a lip-smacking, tasty dish which leaves your home fragrant for the rest of the day!
The other one is an old favourite which comes with its own story – read about it further down!
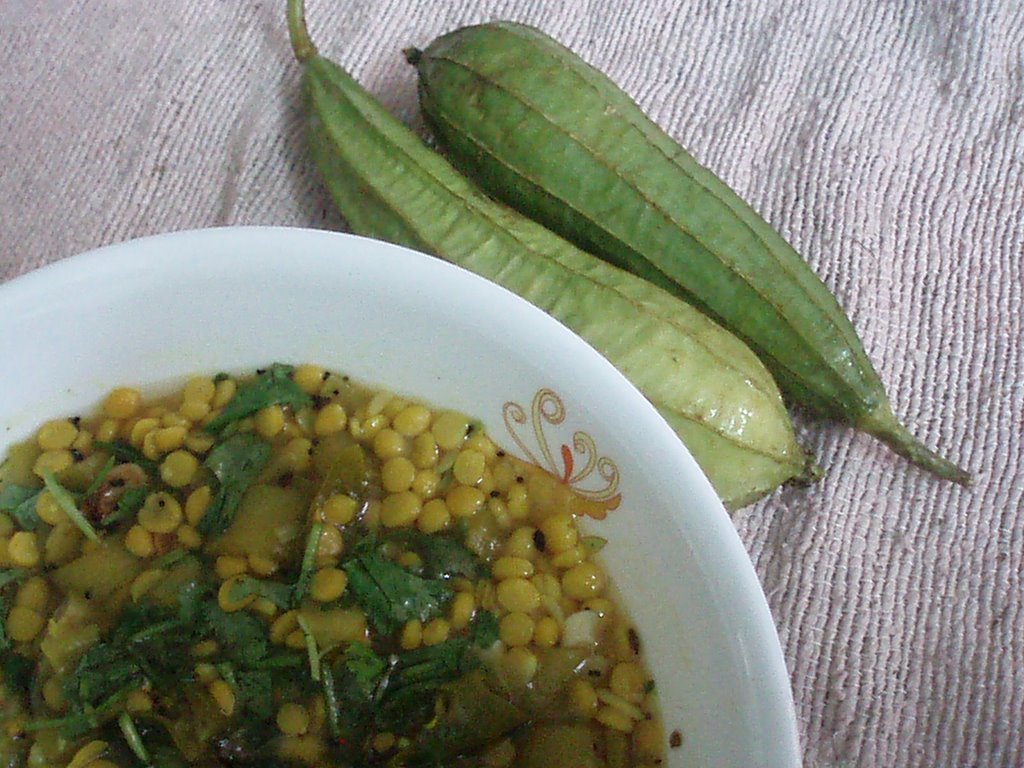
Funny how I forgot this dish existed and was a great favourite with me when my Grandmom was cooking! I recently saw a post on Masala Magic for Beerakaaya Pappu made with toor daal but as I said in my comment there, this was one daal that escaped our home, and the homes of others I knew. We made many others, though – with tomato, raw mango, a variety of greens, dosakaaya (cucumber/melon cucumber, as it was called in one of these blogs), vaakkaaya (sour little purple-green berries) …
Many days later, however, I suddenly remembered this dish. And I know why Beerakaya Pappu sounded unusual to me – we didn’t call our version by that name, but with an extra detail added – Beerakaaya Senagapappu, for the Bengal gram/yellow lentil that went into it. I remember Gran cooking a huge quantity of this and once even freezing it; for two or three days in a row, she would take this speckled green-and-yellow dish sparkling with ice out of the freezer, ladle a few servings into another dish, heat it and serve it.
I wasn’t interested in cooking then, and I couldn’t find the recipe in any book that I have now, but found one for ridge gourd with toor daal that promised to emulate the consistency of this old favourite. Only, it didn’t turn out as great as my Gran’s. This one used tamarind, I’m not sure hers did.
Here's how:
Ridge gourd/Beerakaya, diced – 250 gm
Bengal gram/yellow lentil/channa daal – 1 cup
Onion, chopped – 1
Tamarind – Lime-sized
Green chillies, slit – 6
Chilli powder – to taste, but half a tsp would do
Turmeric – a pinch
Salt
For the tempering:
Mustard seed – 1 tsp
Jeera/Cumin – ½ tsp
Black gram/split urad daal/minapa pappu – 1 tsp
Garlic, squished under the knife – 4-5 cloves
Dry, red chillies – a couple
Curry leaves – a few
Coriander leaves/cilantro, chopped – a fistful
Oil – 1-2 tsps
Soak the daal in water for a couple of hours, then cook with some water – it has to hold its shape. Then put in the ridge gourd, onion, green chillies, salt, turmeric and chilli powder and cook for another 5 minutes. Extract the juice from the tamarind, add it to the pot and cook some more. Or you can cook it in a pressure cooker/pan from the beginning but use the weight only at this stage. After one hiss, take it off the fire. Wait for the pressure to come down on its own. Don’t force the weight open, it’s dangerous.
In a small frying pan, heat the oil, splutter mustard, cumin and black gram, then the garlic, then the red chillies and curry leaves. Make sure it doesn’t burn and blacken. Pour this into the daal, garnish with coriander leaves. Serve with rice or even puris/chapathis. As you like it!
Tags: chicken military hotel beerakaya/ridge gourd
Monday, November 20, 2006
How Green Was My Valley
This was my weekend break ... a long boat cruise from morning to evening, punctuated by a rather rustic buffet lunch at one of the villages on the banks of the Godavari. Cooked on another boat that followed us there, the lunch was set up on rusting trestle tables and served out of steel buckets. It included pulihora (lemon rice), plain daal, cabbage with channa daal, fish, mutton and chicken. Nope, there was no dessert. Middling in taste, but a good experience. Here are some pictures from the rest of the trip!

Sri Ramagiri, the hillock we passed as we set out on the cruise. The temple is dedicated to Lord Rama. The boatman asked, but we didn't break journey.

A slice of the landscape so typical of the early part of the journey. Our destination was Papi Kondalu, an area known for its mountains, vegetation and scenic beauty.

The mountains we wanted to see. We don't actually get off in that area but cruise along and then turn back.

Journey's end. Isn't it just like a scene from a painting? These are Dad's pictures.
Sunday, November 12, 2006
No Cowardy Custard!

Nope, this is no cowardy custard! It looks like the usual crème caramel but is flavoured with saffron and pepper, and omits the vanilla totally! This is my entry for November’s The Spice is Right hosted by Habeas Brulee.
You need to use a hefty dose of saffron and freshly ground pepper for the flavours to come through. It did smell eggy when it came out of the oven but not later. I once made caramel custard with orange zest and saw a recipe for one that included ginger — have to try that out when it’s binge time next!
The rules for the event demand that I mention a few facts about saffron and pepper – I’m sure most of you know but here’s my spoke anyway — Saffron is the dried stigma of the crocus flower (crocus sativus) and is used to colour and flavour food including biriyanis, pulavs and desserts. It’s very aromatic and combines well with milk-based desserts. Apart from its medicinal qualities, in Ayurveda, it’s believed to lighten skin so many fairness creams and soaps in India use saffron! It’s one of the most expensive spices, and that makes this an expensive dessert to make and eat – talk about hurting one’s own interests!
Pepper has a host of therapeutic applications as well, apart from culinary. It is supposed to act as an appetizer, and a drink using pepper and hot milk is used as a remedy for cough. As for why I chose them this month, I'm not sure - probably because I came to know about this event only this month and thought the spices would be a nice variation.
The recipe for the custard is a synthesis of various recipes that I’ve followed over time but the spices were my own idea. My experiment resulted in a mildly flavoured, set-just-right custard that tasted great after chilling for 3-4 hours. So, on with the show!
What you need:
1.5 cups heavy cream
3/4 cup milk
3/4 cup sugar
3 eggs
2 egg yolks (the whites can go into an omelette)
A tsp or more of saffron (soak in 2 tsp of hot milk)
1-2 tsp of pepper powder, freshly ground
A pinch of salt
Around 1/2 cup sugar for the caramel
Oven temperature: 180 degrees C
Here’s how: Scald the cream and milk in a saucepan (until you see tiny bubbles on the sides of the pan). Meanwhile, in a mixing bowl, slowly beat the 3/4 cup of sugar into the eggs and yolks. Even more slowly, whisk the cream-milk mixture into this egg-sugar mixture. Strain it through a double-lined/fine sieve. Stir in the salt. Add the saffron and pepper at this stage.
In a baking dish with deep sides, arrange some ramekins. (I used six because I had six, and found that I had some custard left over.) Put sugar for the caramel in a saucepan. Add just enough water to cover the sugar and put it on high heat. Very soon, it will come to a roiling boil, then thicken, and turn colour. Watch it very carefully at this stage, it can easily burn – when it is an even golden brown, carefully pour it into the ramekins. (It’s a good idea to wear oven mitts during this process as the saucepan will be very, very hot.) Make sure each ramekin has a thin layer of caramel.
Pour the custard into the ramekins, fill the baking dish with water enough to come halfway up to the sides of the ramekins. Bake until just set – it took me an hour but keep checking. Once it’s done, cool, cover with cling film and refrigerate.
To serve, run a knife around the edges and invert on to a plate. If you want to impress your diners, and yourself, float some strands of saffron and a few peppercorns in the caramel sauce around the custard, or sprinkle some saffron on top. I’d even go a step further and recommend you use only yellow lighting, not white, as long as this feasting is going on :) so that the glossy creams and browns of the custard are intensified! Ridiculous suggestion? Going too far? Who cares?
Wednesday, November 08, 2006
Paatoli (Veggie-Lentil Crumble)
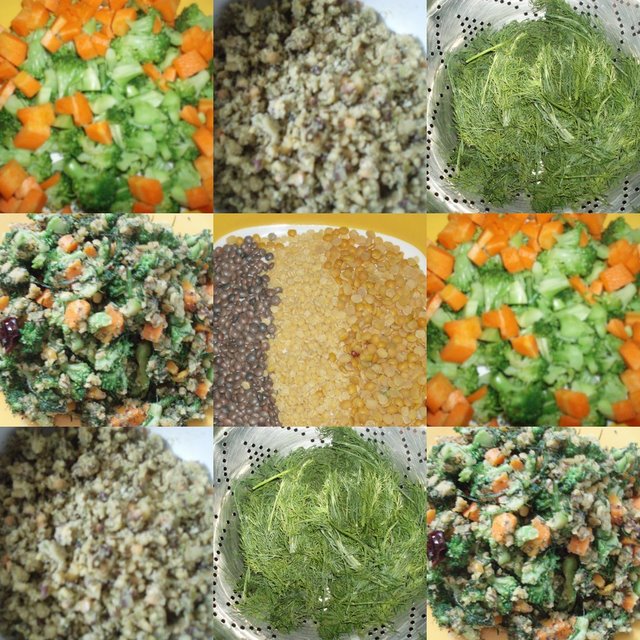
It sat in its box at the grocer’s, tossed along with the other heads. As soon as I saw it, I knew what my next post was about – paatoli with broccoli, carrot for colour and dill for flavour. It’s a versatile dish I first tasted only a few years ago, but seem to have achieved an approximation of perfection with only in the last few weeks.
Paatoli (paruppu usili in Tamil - that's the only other name I know) looks very pretty with green and red capsicum (peppers) bits, nice and green with the traditional French beans or cluster beans and I even made a slightly magenta version once with beetroot and carrot! The broccoli version is a serendipitous find – made years ago to see whether an “English vegetable” goes with a very traditional Indian dish.
Here’s my recipe:
1 small head of broccoli, cleaned, separated into small florets
1 big carrot, diced small
1 bunch of dill, washed thoroughly, chopped
Turmeric powder – ¼ tsp
Oil – 3-4 tbsp
Mustard seeds – 1 tsp
Green Chilli – 1, slit
Red chilli – 1, halved
Salt
½ a cup red gram
¼ cup black masoor daal
¼ cup green gram
All three lentils are to be washed and soaked in warm water half an hour in advance
3-4 green chillies, slit
Cumin – 1 tsp
Peppercorns – 1 tsp
Ginger – chopped, a tbsp
Coriander leaves – ½ a cup
1. Boil/microwave the broccoli and carrot with the turmeric and salt till just tender. They should not lose their crunch.
2. For the crumble:
Drain water from the soaked lentils, grind them in the mixer with some salt, slit green chillies, cumin, pepper, ginger and coriander leaves. Try not to use water – it should have the consistency of a coarse mixture - see centre picture, first row.
3. Put this mixture in a dish and steam it in a pressure cooker for about 12 minutes without the weight on – if you use the weight, you’re in for a watery paste and an irredeemable dish.
Make sure that the water at the base of the pressure cooker does not boil over into the dish containing the crumble. Keep an eye on the pressure cooker – it will emit steam only as long as there's water in it – as soon as it stops steaming, turn off the heat and put it in more water if the mix inside isn’t done yet.
4. Once it’s done, cool, crumble and set aside.
5. In a pan, heat the oil, put in the mustard, wait for it to pop, lower flame and then put in the green and red chillies. Add the dill, sauté for a minute or two.
6. Now add the broccoli, carrot and crumble. Fry for a while, check for seasoning and add salt if required.
7. The perfect paatoli will be powdery, light and not stick to the pan – but I find that this comes with practice. I also find that the veggies and lentils are disproportionate sometimes, but I don't see it as a failing unless the crumble obscures the veggies. You can always refrigerate extra crumble or extra veggies for another day!
8. This goes well with chaaru/rasam and rice, and is good to eat with a bowl of curds/yoghurt as well.
Thursday, November 02, 2006
Daal with Greens
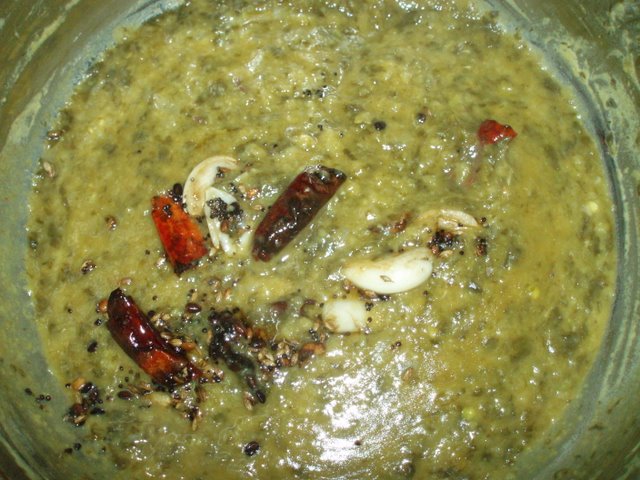 One of the distinctive features of Andhra cuisine, I think, is its daals with greens. Be it spinach, sorrel, amaranth and other varieties I don’t know the English names of, they can all be combined with lentils to make greeny-yellow affairs that go well with rice, pickles and appadams and even breads such as chapatti and puri. And if you soak the daal for a while and use a pressure cooker, it’s done in a jiffy! For today’s recipe, I’ve chosen what is known as chukkakoora in Telugu. Madhuli of My FoodCourt has a picture of these greens on her blog – I didn’t decide to put this in mine till I chopped up the greens and assembled everything in my spanking new stainless steel pressure pan and decided it made a pretty picture. This recipe works well for most greens and most daals, though I’ve never used channa daal, I must say. Chukkakoora (and gongura) is naturally sour, but for the other greens, you can use a little tamarind extract and one or two country tomatoes for added flavour. You can also go with just one of these or try a combination to see if the proportions work well — I confess I’ve never got the formula standardized so each daal is a discovery everyday, but rarely a tragedy! Now that I’ve made one confession, here’s another – I’ve never bothered with quantities, just rough measures so here’s what you need:
1 bunch of greens – 100-150 gm – thoroughly washed and then chopped - if the stalks are big and tough, you can discard them
A cup or so of daal, preferably red or green, usually hulled – soaked well in advance
1 small onion, chopped
A pinch of turmeric
2 or 3 green chillies
(Optional)
2 tsps thick tamarind extract
A tomato or two, chopped
Tempering: Some cloves of garlic, crushed
Mustard seeds, cumin, black gram daal – all approx half a tsp
Red chillies – a couple, torn into three or four bits
Some curry leaves
A tsp or two of oil
1. Put everything in the pressure pan, check that there’s enough water to just cover the daal, and once the steam builds up and comes through, put the weight on the vent. Let it hiss a couple of times, turn the heat down to the lowest, wait a couple of minutes and turn it off.
Don’t force the pressure cooker open, wait for the steam to escape on its own – if you absolutely have to, sit the cooker in a plate or dish of cold water, that will hasten the process, and gingerly flick the weight to see if it’s ready to come off – if it hisses, it isn’t, if it’s a slow sigh, you’re almost there! If you don’t use pressure cookers, you’ll just have to boil the daal in a pan – I haven’t attempted that with success, so I won’t pretend I know about it, but something tells me it’s simpler to boil it without the other stuff first.
2. Now, once you open it, mash the contents into as homogeneous a mass as you can, season with salt and red chilly powder. (I don’t usually put in the salt till the daal is cooked as it might interfere with the cooking.) I also don’t put in the tamarind until after the daal's cooked but I’ve seen others successfully throw it in with the rest of the ingredients.
3. Now heat the oil in another pan, put in the black gram, let it brown, then the mustard seeds, let them splutter, now the cumin, then the garlic and red chillies and curry leaves – let them soak in the oil as much as they can. Make sure the pan isn’t burning, though. Now turn off the heat, tip the tempering into the daal, stir. Or alternatively, you can put the daal into the tempering, add the tamarind extract and salt and chilli powder at this stage, let it boil a bit and take it off the fire. I prefer the first method as the tempering doesn’t lose its crunch, relatively speaking.
Monday, October 30, 2006
Baked Apples
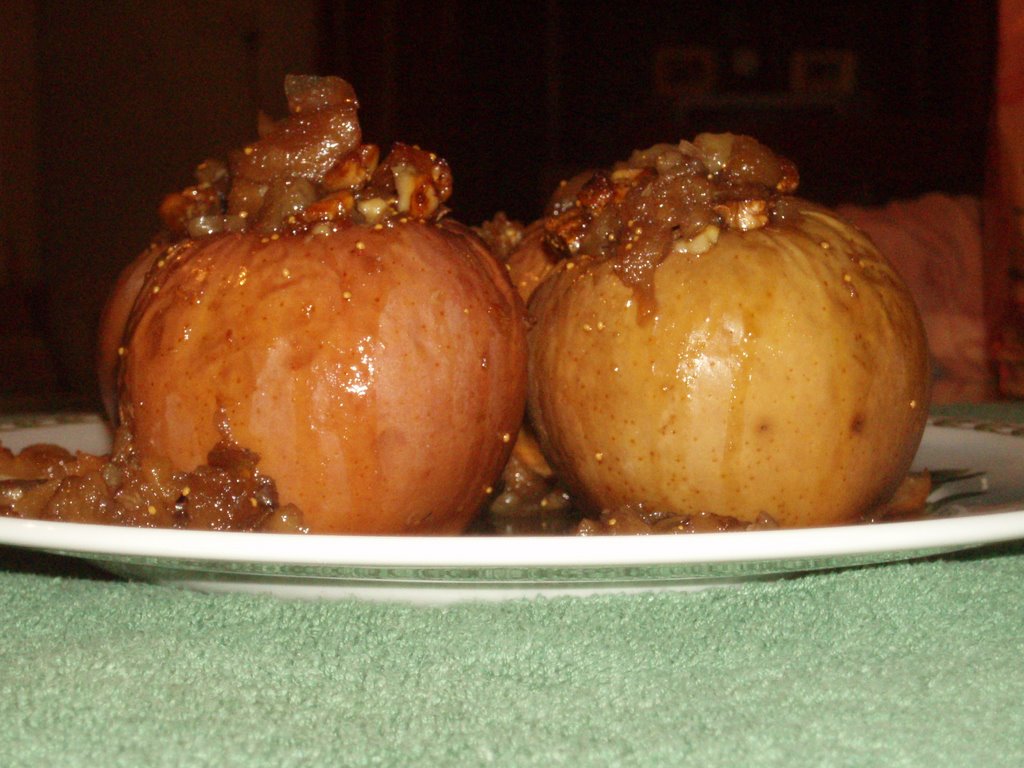
Here’s a simple recipe, the only thing time-consuming about it is coring the apple if you don’t have a corer. I adapted this recipe from Cook Right For Your Type by Dr Peter J. D’Adamo (with Catherine Whitney), published by Century, 2001. This can even be had for breakfast, the books suggests. The link will tell you a little about this diet but meanwhile, happy baking!
I substituted the maple syrup with 'lemon-honey'. I don’t know whether that’s allowed, but this recipe is given here solely for cooking/eating pleasure and the book acknowledged because I feel honour-bound to do so, certainly not to promote any diet nor take away from it with substitutions/additions/omissions.
Here’s how:
4 apples (Rome, Granny Smith, Fuji)
½ cup chopped walnuts
½ cup mixed dried figs and apricots – I softened dry apricots by soaking them in hot water for an hour but maybe it’s not necessary
juice of ½ lime (I used a full lime)
2 tbsps butter or margarine
1 cup (236 ml) boiling water
2 tbsps honey
Preheat oven to 180 C (350 F, Gas Mark 4). Core apples, make sure you don’t pierce the bottom. Mix walnuts, dried fruit and lemon juice. Pour enough honey over this mixture to moisten well. Fill apples without packing them too tightly. If the mixture mounds at the top, it’s alright. Put a bit of butter on the top and put apples in a baking dish. Pour boiling water into the dish around the apples. Bake 20-30 minutes till the apples are tender.
While they are baking, the book says, you can baste the apples with the pan juices. I’m wary about this so I didn’t do it. When apples are done, transfer to a serving dish, pour liquid in pan (and any fruit mixture left over) and reduce over medium heat until thickened. Pour sauce over apples before serving.
The end result was a not-very-sweet-until-you-came-to-the-filling apple, but it really seemed to work as a light dessert. Maybe you could try it with a bit of ice-cream, or you could scoop out more of the apple and put in more filling. If you try it, let me know!
Wednesday, October 25, 2006
Pandan Prawns
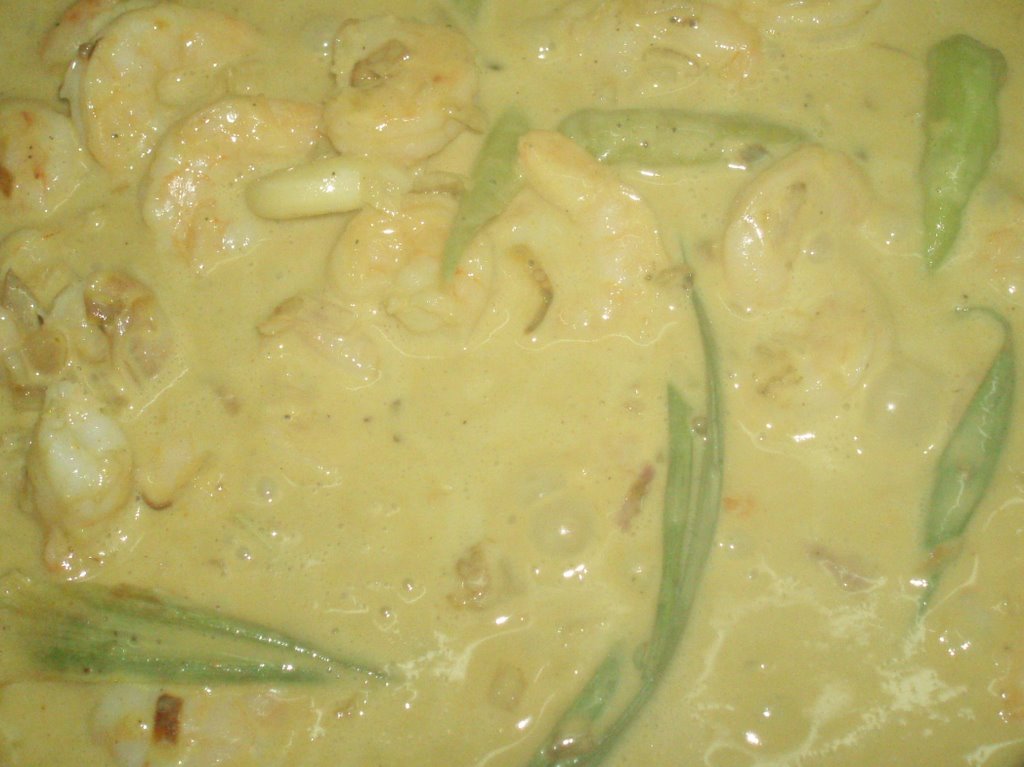
Palav or fried rice at home often had these aromatic, long leaves curled languidly around it. They didn’t know what it was called, but were using it on the advice of a friend who brought them the plant from Malaysia many, many years ago. Only recently, I asked that friend’s family to give me one, and it arrived after two months, with a pretty pink ribbon tied around the pot!
This is the first dish I’m using it in – after letting it grow a bit in my own place. I can’t say it tasted of pandan - but it filled the house with its fragrance even before it went into the pan, tempting me to break off a conversation on the phone in the next room and savour its richness to the full.
Here’s how I made it:
250 gm shelled and de-veined prawns
1 onion, chopped
2 cloves garlic, crushed/minced
3 green chillies
200 ml coconut milk
1 tbsp coriander powder
½ tsp turmeric powder
3 pandan leaves
1 tbsp oil, or even less
Salt and pepper
Heat the oil, fry onions, garlic and green chillies together till soft. Then put in the coriander and turmeric powders, and on low heat, fry till they release their flavours. Put in the pandan leaves, stir for a few seconds, slip in the prawns and coconut milk. Add some salt, stir and let it simmer till it thickens. Take off heat and add pepper. Serve with rice, ordinary or Basmati. I also think it will taste good with dosa, aapam or idiaapam.
Monday, October 23, 2006
Zesty zucchini

It was the picture and the unusual combination that inspired me, not to mention the lone, fat, zucchini rattling about in my refrigerator. A night of sleeplessness ensured that I prepared the zucchini as well as the zest for this morning’s blogging at 2 a.m. My picture’s not as good, but it will have to do. The recipe is from Reader’s Digest’s 30 Minute Cookbook, with minor changes.
Here’s what you need:
500 gm zucchini (smaller ones, the book said)
Zest of 2 limes (1 lemon in the book)
1 tbsp olive oil
Salt and pepper (the book asked for flakes of sea salt)
Trim the zucchini and slice very thinly on the diagonal. Heat oil in a frying pan, add the zucchini and fry till tender. Meanwhile, finely grate the rind of the lemon. Sprinkle on the cooked zucchini and season well with flaky salt and black pepper.
Warning: It tended to be a little bitter in places, so you may want to be more careful than me about taking the zest off the limes!
Sunday, October 22, 2006
Jiffy cheese ’n peas

(DRY MATAR PANEER)
All the visiting and eating that goes with Deepavali makes for a very lazy cook the next day. But the demands of a potluck meal call out loud, so to balance my lassitude with those and come up with a dressy dish, I made this stir-fry of cottage cheese and fresh peas. If you use fresh peas or dried peas soaked overnight, boil them till soft/pressure-cook them for one whistle. It’s even faster if you use frozen peas. You can use tofu in place of the cottage cheese. And oh yes, don’t forget to season the peas with some salt while they boil!
Here’s how:
225 gm/2 big fistfuls of cottage cheese/tofu, cubed
A cup of peas, shelled & boiled
A tsp of oil
3 green chillies, slit
½ a tsp of cumin/jeera
Some salt and cracked pepper
Coriander leaves/cilantro for garnish
Heat oil in a pan, put in cumin. Once in splutters, put in the chillies, saute for a few seconds, then put in the peas and sauté for a while. If you’re using frozen peas, put in a teensy-weensy bit of salt and mix. Now put in the cottage cheese/tofu and sauté again. All this can be done on low/medium heat – make sure the cheese doesn’t stick to the pan. Now check for seasoning and add a little more salt if necessary, turning once again. The cheese might splutter a bit but don’t worry, it will stop soon. Now add the coriander leaves, stir lightly, turn off the heat and sprinkle with cracked pepper. Turn once more et voila, dry matar paneer is ready!
PS: Am testing comment moderation
Friday, October 20, 2006
HAPPY DEEPAVALI!

HERE'S WISHING YOU ALL HAPPY, HEALTHY, WEALTHY, FOODSY TIMES AHEAD! MAY YOUR LARDER ALWAYS BE STOCKED, YOUR BELLIES PLEASANTLY FULL AND MAY YOUR BLOGS ALWAYS DAZZLE WITH FOOD, FRIENDSHIP, LIFE, LAUGHTER AND LOVE!
Thursday, October 19, 2006
Emerald-ruby-topaz stir fry
 Actually, it’s chorizo sausage, capsicum (peppers) and potato. And a bit of onion. Ever since I got my hands on the chorizo, almost a new ingredient for me, I’ve been itching to make this, but it materialized only today.
Once I tasted the chorizo, I realized it’s a lot like pepperoni. Go easy on the salt, though, the sausage has enough of it.
Here’s what you need:
½ a kilo of potatoes, peeled, cubed medium-size
Some oil – just enough to coat the frying pan and a little more - the sausage oozes its own fat
1 big onion, sliced
½ a kilo of green capsicum/peppers, cut into medium-sized pieces
¾ cup white wine
A bit of salt and pepper
Fry potatoes with salt, turning frequently, in heated oil, on medium heat until browned – about 15 minutes. Remove potatoes, reserve. To the same pan, add chorizo, capsicum and onion until softened – about 10 minutes, but keep checking and turning. Now add wine and boil down. Take it off the heat and add potatoes to this mixture, check for salt and then season with pepper and more salt, if necessary.
I mopped up the juices with a slice of white bread, heavenly!
Tuesday, October 17, 2006
One more chutney (Vankaya-dosakaya)
A friend’s mother made this once, and I’ve been sold on it ever since. Mine is not a patch on hers. Anyhow, I think the best thing about these chutneys is the tempering –the brown, crunchy bits of black gram, the cumin and the mustard lend texture to the otherwise soft mix. But again, it’s not as if the chutney doesn’t have texture in its softness – if it hasn’t been whizzed to paste, you can feel the vegetables too. In any case, my friend’s mom’s preparation was a glorious amalgam of purple and yellow, tempering in thick, golden sesame oil pooling in the depressions made by the spoon. I know, I know, oil is not politically correct, but I’m wondering if we should make an exception for pachchadis.
Here’s what you need:
Dosakaya/Round yellow cucumber – 1 (but not a full one if it’s big), sliced rather fine but thick enough to hold its shape Brinjal/Eggplant – ½ a kilo of the long, purple variety, but you can probably use the bigger ones as well – cut into small pieces
Green chilli – 8-10 or more, chopped
Onion – 2 small, chopped
Oil – Ahem! Well, enough to fry the eggplant well, chillies and tempering one after the other
Tempering – Mustard seed, cumin, black gram as much as you like (but not in fistfuls, no), a few curry leaves
Tamarind – marble-sized
Garlic – 7-8 cloves
Rock salt
Fry the eggplant in hot oil till soft, remove and set aside. In the same oil, fry the green chillies. Set aside. Now put in the black gram. As it turns golden, put in the cumin and the mustard seeds, let them pop. Add the curry leaves. Turn off the heat. Cool everything if your mixer’s the kind which should not be used with hot ingredients. Transfer eggplant, chillies and tempering into the mixer jar, add tamarind, garlic and rock salt and use the lowest speed to blend. Do this in very short bursts otherwise you may still end up with paste. Now spoon this into a bowl, mix in the cucumber and the onion. You can add more tempering if you want. Serve with rice and ghee.
Saturday, October 14, 2006
Not Quite Mush (Dondakaya pachchadi)
 It’s not supposed to be mushy, I think, but I’d probably sliced the Dondakais too fine, so it almost got pulverized. The taste remains the same, though the texture could do better. Here’s the recipe for this crunchy, tangy, fresh-tasting chutney:
Dondakaya: ½ a kilo
Gingelly/sesame oil: about 8 tsp (aargh!) or less
Mustard seed, cumin, black gram dal, curry leaf, garlic (optional) - as much as it takes to give a crunchy feel
Green chillies: as many as you can take
Tamarind: walnut-sized or a little more, wetted in water
Rock salt
Cut the vegetable into small pieces, salt them and leave them to get rid of some water. Meanwhile, chop chillies, fry them in the gingelly oil, put them aside and fry the mustard seed, cumin, black gram and curry leaf and garlic in the same oil. Now go read a paper or a book for a while. Then come back, squeeze the vegetables well to get rid of the water, put them into the mixer with the chillies, fried seeds, tamarind and rock salt and pulse it – I think I went wrong in letting it run continuously, but it seemed to work the last time I made it.
Meant to be eaten with rice and ghee.

Thursday, October 12, 2006
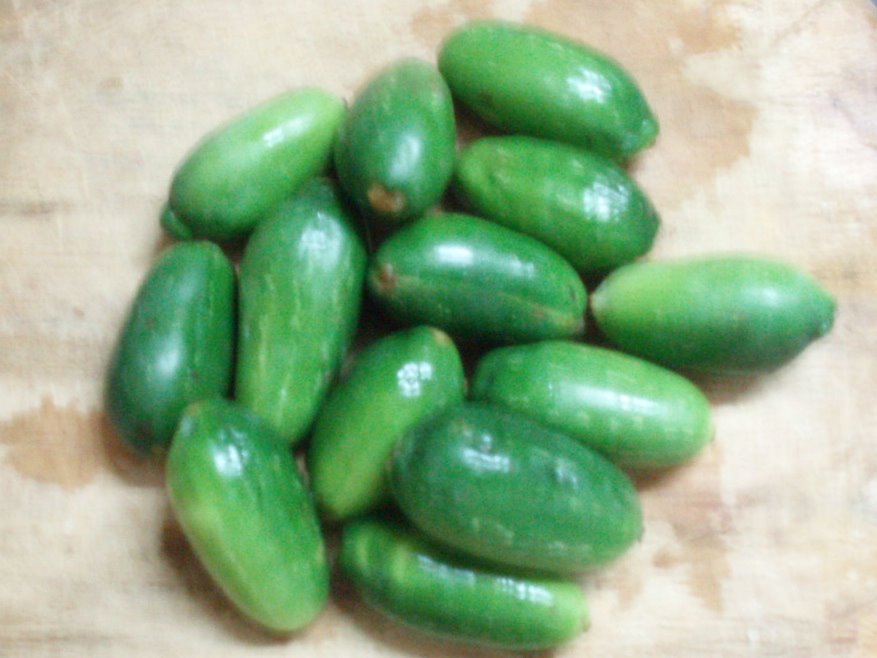
WHAT ON EARTH IS THIS?
 What does it remind me of? A dragon? A dinosaur? I really can't put my finger on it. But then, I've never, ever seen this vegetable, described as choux romaine in the supermarket. Never even heard of it. Have you? What does one do with it?
Wednesday, October 04, 2006
Five things to eat before I ... Aargh!
Five things to eat before I ... (And want a steady supply of)
Thanks Asha, for tagging me.
As I write, I can only think of three. One is something I’d like to try, the others are something I’ve eaten and yearn for. As for the other two, let me see if I can come up with something!
The first is raw food of the vegan kind. I read about it in the New York Times, which said it was fast acquiring cult status and even reviewed a few restaurants. It was a fascinating read. The pictures looked, well, good enough to eat. I want to try it before I decide whether I want a steady supply of it.
Where have all the oranges gone? That’s the second item on the wish list. Big, heavy, loose-skinned tangerines with juicy segments. Which exploded with juice when you bit into them. It’s at least 10 years since I’ve seen that quality. All I find are diminutive, fist-sized abominations that are sour and very often, dry, orange-turning-sickly-white and wrinkled inside. Or the big, very orange, imported ones that seem to have an endless web of fibre and thick skin inside that by the time you get to the flesh, most of the juice would have slipped through your fingers and you’re left with two choices: lick all the surfaces it dripped on to and eat the remainder uncomplainingly, or not eat them at all. I take the easier way out.
This receding citrus brings me to the fourth item on my wish list - its cousin, the pommelo. This sometimes conical, sometimes round green fruit with its thick peel and pinkish-inside membrane parts to reveal segments with sturdy, pale pink ‘pearls.’ Sometimes they could be yellow, but I prefer the pink beauties. They make an appearance in the bazaars only in August, and only a week long, at most. If you don’t have a tree yourself, their presence in your home largely depends on the grace of neighbors who possess a tree or kindly aunts who arrive bearing a limited bounty of two or three. No sourness here, just a hint of it and a suggestion of bitterness - a taste all its own! Sigh!
The third item on my list is Haleem. The haleem I ate in Hyderabad’s old city in the month of Ramzan many years ago. That’s the real thing, they said. You get authentic haleem only in the old city, they said. There on a visit during the same time last year, I was surprised to notice several restaurants all over the city offering it. I wish I’d had the time to try it, but at least, it’s not uncommon anymore, like the tangerines or the pommelos.
And lastly, there is no fifth item. There are several foods I’d like to try and they are too numerous to list. It’s also happened that sometimes, the foods I’ve finally tasted are not as good as I’ve imagined them to be. Which, I think, is a good thing, though a bit romance-killing, because that way, you can keep deep disappointment at bay.
I would like to tag Sudha of Food Newbie for this meme.
Monday, October 02, 2006
Playing Tag - The Butterfly Effect Meme
I’m tagged, for the very first time. Thank You, Paz!
This meme asks us to name food items or events that changed our foodie lives. Specifically, we’re asked to recall an item, person, event or place that affected us profoundly, and marked defining moments in our lives. Not necessarily “big and splashy” but can be something small and simple, something that changed the way you view the world. I’m not sure if they changed the way I view the world, but they did change the way I cooked, thought of food and made it a joyful experience.
These are the categories:
An Ingredient: Yeast. My interest in cooking began with baking. And like many who take on a new hobby, I was all into it, wanting to make my own bread, my own pizza bases, and what not! But my yeast would never “start foaming”. I didn’t realize that I had to use warm water, not hot water, which was killing it off. When I finally used warm water, by accident, it worked, and for me, it was a big day – the joy that I’d got something right, that I finally owned the knowledge to make something work. A moment of pure happiness.
A Dish: This is more recent. It’s not so much a dish as a method. I’ve always liked stir fries but this recipe for vegetables I saw in a Bengali cookbook somehow makes it very simple and quick, and is a great way to use up the stray vegetables in your refrigerator. I also like the spice mix that goes into it: a teaspoon each of mustard seed, aniseed, fenugreek, ginger, nigella and cumin sauteed in oil, pieces of five different veggies (potato, eggplant, peas, okra, most veggies, really) then stir-fried on a high flame , then simmered in their own juices, covered – the result is an inviting mix of veggies, neither squishy nor hard.
A Meal: Each new meal is a discovery and affects our lives in its own way. However, I will name a traditional favourite that brings back fond memories of grandmothers and airy kitchens and a day buzzing with activity: Rice with ghee and mango pickle of the first day. Fresh pickle is always pungent and even a tad bitter with its freshly-ground fenugreek and mustard seed powders. At home, pickle was made by the barrel and emptied into jaadis (earthen jars) to cure before it was ready to be shipped out to the rest of the family. The residue in these barrels would then be mixed with hot, soft, rice. Some butter would be added to it and that would be the treat of the day! Watching the white butter melt rapidly in the red, hot rice was magical!
A Cookbook or other written work: I have to say that my love for food and cuisine was intensified by the Dining and Wine columns of The New York Times. I wish I could write like that.
A Food Personality: Sanjeev Kapoor, I guess, but I haven’t watched his show, or anyone else’s, in years.
Another person in your life: My family and friends – Some didn’t really approve of my hobby, but would always indulge me, try a bit of what I made and invariably say it was good; the others always encouraged me, one to the point of calling me a food artist!
Paz of The Cooking Adventures of Chef Paz tells me Dan@saltshaker.net started this meme and that we should let him know and link to the original post, so here it is!
http://www.saltshaker.net/20060630/the-butterfly-effect
I would like to tag Asha of Foodie's Hope http://www.foodieshope.blogspot.com for this meme.
Friday, September 29, 2006
MIXTRESS OF SPICES

The minute I saw the announcement for JFI-Ghee http://cookingmedley.blogspot.com I knew what I would enter. Only, I didn't know the recipe. My friend at college used to bring out a Horlicks jar of ghee with pale pink onion bits floating at the bottom during dinnertime. Maybe there was pepper and cumin too, I’m not sure. For extra flavour, she would say, her eyes shining with anticipation as she set the jar down on the table.
I don’t remember ever tasting it because I wasn’t a fan of ghee then. I’m no fan now either, but definitely more adventurous, so when this memory got raked up, I had to somehow find a way to make it. I mulled over it, imagined it several times, trawled the Net, asked people, looked up recipe books, but finally decided on the ingredients after reading a recipe on this web site http://rwood.com for seasoned homemade ghee.
The recipe called for a pound of butter, but as she writes, yours truly realises she reversed the kilo-pound equivalents in her fevered new blogger’s enthusiasm and ordered a kilo of butter to be delivered home. The shop around the corner only had 750 gm, and so she ended up using that rather than the kilo she wanted, and the 450 gm that she was supposed to use! The result wasn’t too bad, anyway, and it was a wonderful photo-op! How I made it:
750 gm butter
1 white onion, chopped
2 big cloves garlic, chopped
1 tsp cumin
1 tsp coriander powder
1 tsp black peppercorns
½ tsp turmeric
1-inch piece cinnamon
1 bay leaf
A few cardamom
Some powdered nutmeg or mace
Method: Place the butter and spices in a heavy saucepan and melt over medium heat. Don’t cover the pot. Soon, the butter will start foaming. Once it begins, reduce the heat and simmer uncovered and undisturbed for about half an hour. You’ll begin to wonder if your kitchen hasn’t turned into Niagara Falls - that’s the kind of noise my ghee made. At home, it was never such a big production - it was made, the solids (called Godaari) were scooped into a spoon and given out as a treat to eat, and that was the end of it. By now, you would have realized this was my first attempt at ghee-making, so I was anxiously looking for the signs the recipe specified:
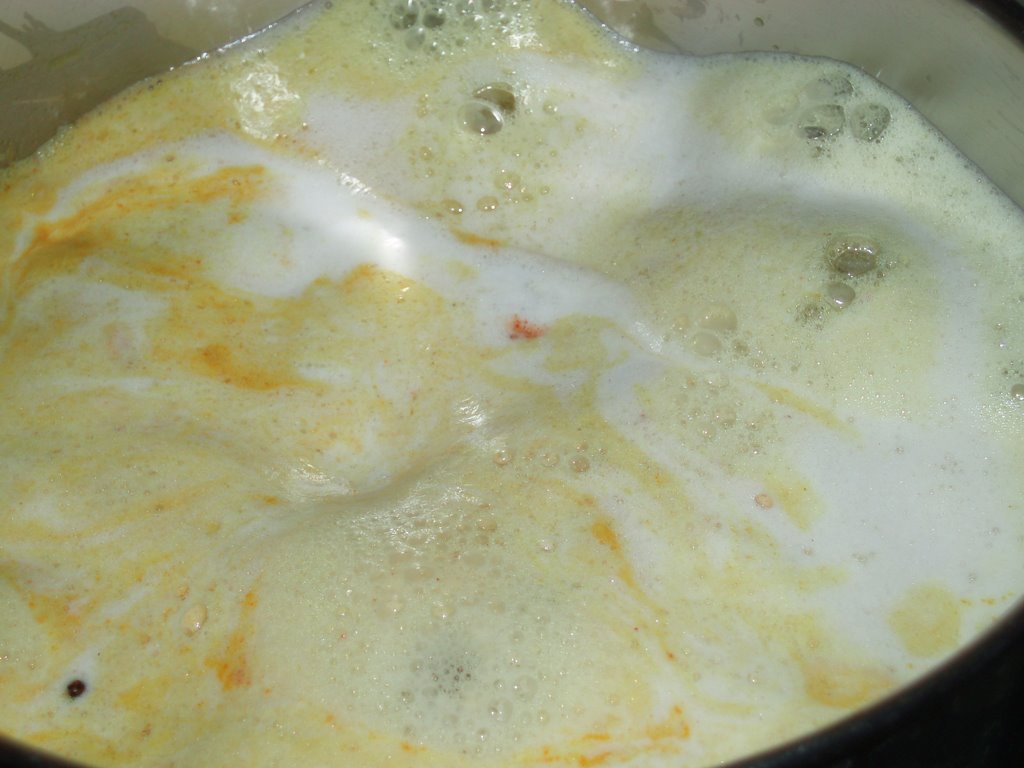
Changing from cloudy yellow to clear golden colour (it never seemed to)
Developing a popcorn-like aroma (it never did, not even when I risked burning my face sniffing into the saucepan)
Stops foaming and making crackling noises (nope, it did neither, but later the foam broke up into small bits, though it still covered the surface)
Develops a thin, light tan crust on the nearly motionless surface (when did it ever stop bubbling?)
Milk solids at the bottom turn from white to tan (it was all so murky, I couldn’t see a thing till I fished for them with a fork)
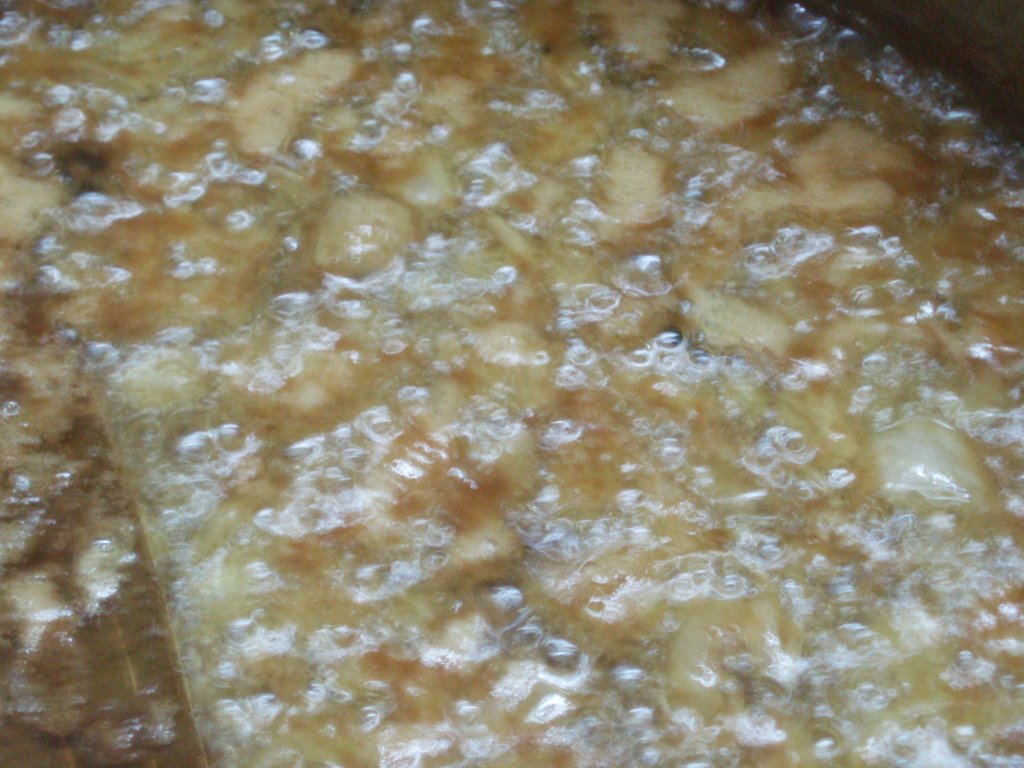
You’re supposed to keep a close watch on the ghee and remove from heat when done. Signs of overcooking, says the web site, are browning and foaming (heavens, mine looked like that throughout, from foaming to finish - I'm not sure where I went wrong but I was determined to not give up, so I continued hovering anxiously over the stove.) Let cool until it is just warm. Sieve it into a jar or a container, discard the strained solids.

At this stage, mine looked fine. And it tastes nice too. Kaaram neyyi (Hot ghee), a guinea pig said, but they probably meant spicy, as nothing chilli ever went into it!
We tried it with plain rice, with various kaarams, dal and chapati, it tasted best with plain rice and plain dal. It will probably make a good base for pulaos and enhance the taste of plain basmati rice! I’ll let you know.
Monday, September 25, 2006
WHEW!
That’s what I said after I finally finished making today’s dish, Tomato Bread Pudding. I found it pretty time-consuming, probably because I was doing a few other things at the same time.
I’d never come across TBP earlier. A few years ago, my aunt presented me Michele Anna Jordan’s The Good Cook’s Book of Tomatoes but somehow, this recipe escaped my eye. I had a surplus of tomatoes this week and I needed to use some of them, so when I spied this recipe, it sounded interesting enough to put in the blog.
My experiment resulted in a moist, very slightly pinkish custardy bread when you broke through the golden-brown crust on top. The recipe asked for half a pound of bacon but since I don’t stock any, I just left it out but added an onion fried in olive oil.
What you need:
Pure olive oil
4 cups bread, torn into medium-sized chunks
2 medium tomatoes, sliced
An onion, fried till pink (optional)
3 tbsp finely minced coriander
2 ounces Cheddar
2 eggs, beaten
2-¼ cups milk
2 tbsp commercial tomato puree
2 cloves garlic, finely minced
Salt and freshly ground black pepper
Method: Rub a decent-sized but not too large baking dish with a thin coating of olive oil. Toss bread, tomatoes, cheese, coriander in a mixing bowl. (At this stage, you can pause, admire your handiwork and go on to serve this as salad with a bit of salt and pepper!) Transfer to the baking dish. Whisk eggs, milk, tomato puree and garlic, season with salt and pepper. Pour custard over the bread and make sure it is distributed evenly.
[Photo]Bake in a 325 F oven (160 C) for 35 minutes and then in a 425 F oven (about 230 C) for another 10-15 minutes till top browns. The top browned in the first stage, though a knife inserted into the centre came out wet - I baked it in the second stage, it got browner, as you can see, but the inside was still moist (notice the pale patch in the dish, I scraped off the top to see how the inside was) - it had been 40 minutes by then, so I lost patience and switched off the oven, but as it turned out, didn’t end up tasting too bad. Don’t need to tell you the aroma from the oven was heavenly![Photo]
PS: I must say this tasted rather like the Tomato Baath that is made in South India! I knew it tasted like something but it came to me only a few hours later! I heated the leftovers well today for dinner - it tasted different, like bread and pudding, maybe the trick lay in the heating.
Nimmakaaya Kaaram (Lemon Zinger, do we call it?)
Some mornings, idlis or dosas for breakfast would be accompanied by this kaaram. As the years passed, I left home, the cook took over from Grandmom, this recipe got lost, or maybe it so happened that it was never made when I was around. I only remember the lemony taste and grainy texture, which I thought came from poppy seed but as it turns out, comes from a bouquet of ingredients that doesn’t have any poppy seed in it.
What you need:
Juice of five lemons
Channa dal/Bengal gram: 1 tbsp
Urad dal/Black gram: 1 tbsp
5 red chillies
Fenugreek/methi: ½ tsp
Mustard seed: ½ tsp
Curry leaf/karivepaku: A loose fistful
Salt
Gingelly (Sesame) oil
Method:
Fry everything except lime juice and salt in oil. Allow it to cool. Grind to a paste. Add lemon juice and salt. I think this can even be made with citron (dabbakaaya) juice. For variations, you can add coriander leaves or crushed garlic, I suppose at the time of frying, I’m not sure, really. I added curry leaves as an afterthought. It is a good accompaniment to rice and most traditional South Indian breakfasts but am sure it will taste good on other bland stuff, or rather, food that doesn’t have too many flavors in it already, such as bread. Let me know when you try.

PS: This is my contribution to the You Can Feed a Hungry Child Campaign
Sunday, September 17, 2006
Sunday lunch, and a forgetful cook(book)
Unusual it would be, I decided, and summoned ingredients for a tomato bread pudding (!) but as it turned out, ended up making Yakhni Pulao instead. This recipe’s been lying in wait in a much-used, dog-eared, spice-and-grime-stained cookbook for many years and revealed itself to be not so labour-intensive if you didn’t grudge slicing four onions fine at the outset. No masalas to be pounded/ground, no meat to be marinated for hours, just some tears to be shed.
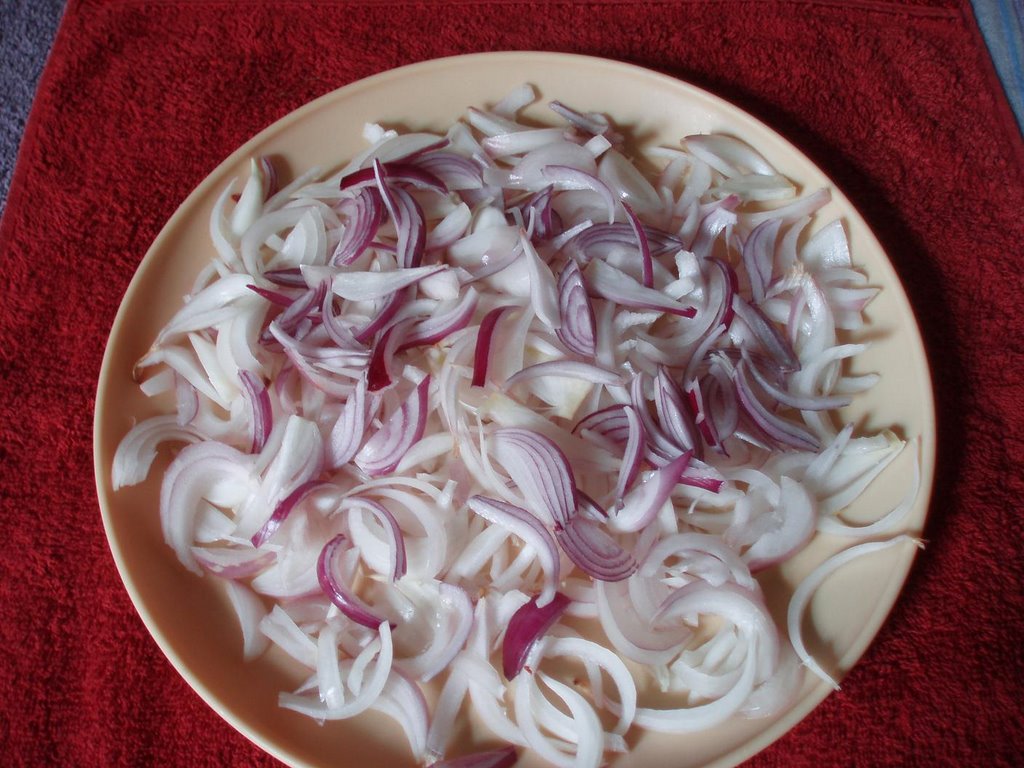
Between slicing the onions, reading the recipe and pressure-cooking the meat, I forgot that the recipe called for one cup of beaten curds. And guess what, the cookbook went on to forget too! And it asked me to fry three onions crisp and save another, but didn’t tell me what to do with that! I realized only halfway through the procedure, but I didn’t really bother to deduce at which stage the curds and the solitary onion went in but I bet my pulao came out tasting all golden and mellow because it lacked the tartness of the curds. The onions and raisins lent it a touch of sweetness.
What you need: 500 gm mutton, 250 gm Basmati rice, 2 pinches saffron soaked in ½ a cup of warm water, a handful each of raisins and cashew nuts (I used very few) fried in ghee (clarified butter), 2 tsp garam masala (curry powder), 6 green chillies, 3-4 tbsp ghee/oil, 10 flakes garlic, 1-inch piece ginger (I used an equivalent amount of ginger-garlic paste), 2 cardamoms, 2 tsp fennel seed (saunf), 2 tsp coriander seed (I used powder), 2 pieces cinnamon, salt
Method: The meat goes into a pressure cooker with 1-½ glasses of water, the ginger and garlic, chillies, salt and the whole spices (cardamoms, fennel seed, coriander seed and cinnamon) tied in a piece of muslin. I dispensed with the cloth. (I suppose the forgotten cup of beaten curds goes in now.) Once it’s done, strain the stock, reserve it. I cooked the meat on high pressure till the cooker hissed thrice, then on simmer for about seven minutes.
In half the amount of ghee, fry the meat till it turns pink; remove. (Maybe the lonesome onion goes in at this stage, just before you pop the meat in?) Put in the rest of the ghee, add the rice, fry till pink (my rice didn’t turn pink).
Add the stock, warm water (dunno where this came from, but I warmed some) and salt — now, figure out how much water you need to use — my 250 gm of rice came to two cups, so I used four cups of liquid including the stock, the ½ cup of saffron water and the warm water, and added about 1-1/2 cup more later (as the rice hadn’t cooked completely). Once it’s done, cover the rice with the fried onions, garam masala, fried mutton and nuts and raisins, cover tightly (or put some heavy stuff on the lid so that no steam escapes) and let everything infuse for about 20 minutes. Mix and serve.
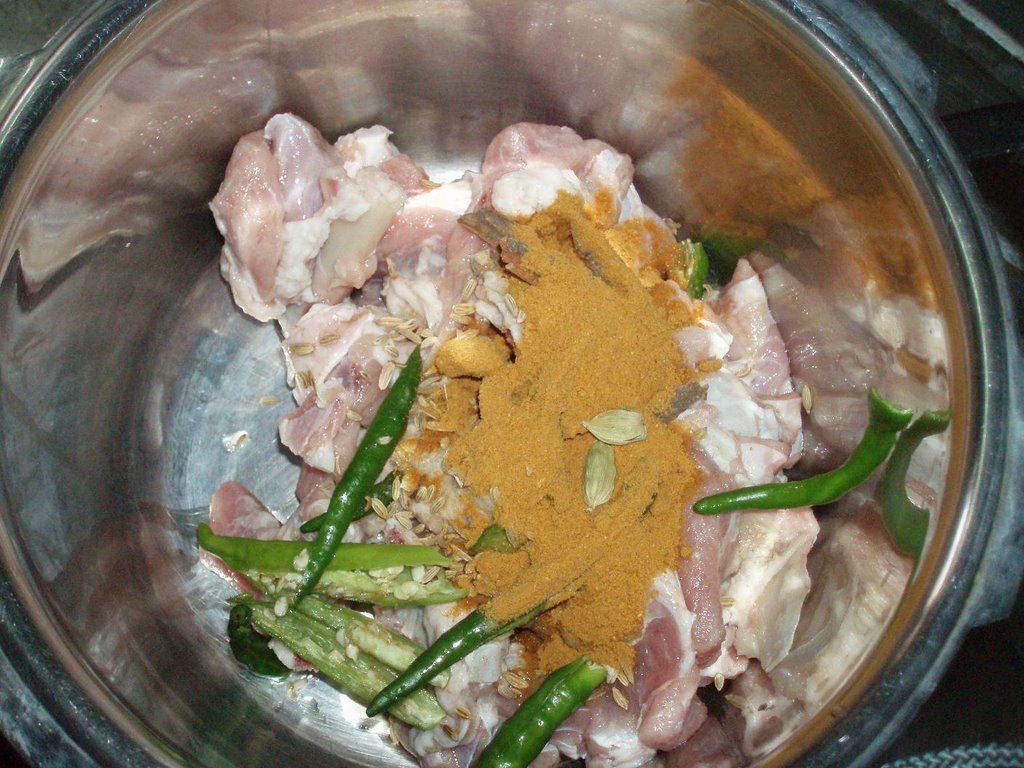
Subscribe to:
Comments (Atom)